CheapASPNETHostingReview.com | Best and cheap ASP.NET MVC 6 hosting. This article introduces both @Html.Action and @Html.RenderAction. These are used to call a partial view in another view by action method. As we have other options such as @Html.Partial and @Html.RenderPartial to call a partial view in other views then why do we use @Html.Action and @Html.RenderAction ? We use these two html helper methods in the following scenarios.
- To call partial view in another view.
- Partial view is independent to corresponding view in other words partial view model in not related to corresponding view model in strongly typed views.
- We need some operations over data of partial view before it render in corresponding view.
- We call a partial view from ChildActionOnly action methods in another view by GET request.
Whenever we got above situation in our application then we prefer to use these Html helper methods. Now let’s have a look on summery information of these Html helper methods.
@Html.Action
This Html.Action renders partial view as an HTML string so we can store it in another string variable. It is string return type method so first it returns result as a string then renders result to response.
@Html.RenderAction
This is also same as Html.Action but main difference is that it renders result directly to response that’s why it is more efficient if the action returns a large amount of HTML over @Html.Action.
Now we will have a look on particle implementation of these two.
Using Code
We create an MVC application which has a view for employee login and employee registration as both employee login and employee registration are independent to each other. To combine these on single view, we create two partial views, one for Employee login and another for employee registration. As these two views are also independent to corresponding views in which these call.

First of all we create two view models one for Employee Login (EmployeeLoginViewModel) and another for Employee Registration (EmployeeViewModel). The following code snippet shows both.
1 2 3 4 5 6 7 8 9 10 11 12 13 14 15 16 17 18 19 20 21 22 | namespace EFOperation.Models { public class EmployeeLoginViewModel { public string Email { get; set; } public string Password { get; set; } } } using System.ComponentModel.DataAnnotations; namespace EFOperation.Models { public class EmployeeViewModel { public string Name { get; set; } public string Email { get; set; } public string Password { get; set; } [Display(Name="Confirm Password")] public string ConfirmPassword { get; set; } } } |
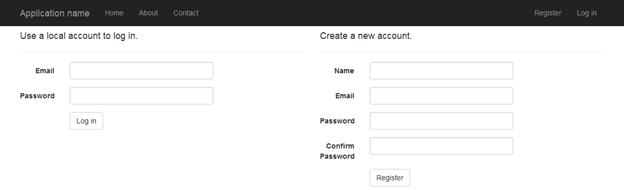
As per figure 1, we create an Index view which has both employee login and employee registration partial view so we define a controller that has three action methods. The “Index” action method returns main view and other two child action methods “EmployeeLogin” and “EmployeeRegistration”. The following code snippet shows EmployeeController.
1 2 3 4 5 6 7 8 9 10 11 12 13 14 15 16 17 18 19 20 21 22 23 24 25 26 27 | using EFOperation.Models; using System.Web.Mvc; namespace EFOperation.Controllers { public class EmployeeController : Controller { public ActionResult Index() { return View("Index"); } [ChildActionOnly] public ActionResult EmployeeLogin() { EmployeeLoginViewModel model = new EmployeeLoginViewModel(); return PartialView("_EmployeeLogin",model); } [ChildActionOnly] public ActionResult EmployeeRegistration() { EmployeeViewModel model = new EmployeeViewModel(); return PartialView("_EmployeeRegistration",model); } } } |
In our example, the Index view is nota strongly typed view. If it is strongly typed then it doesn’t have any impact on partial view model because with help of @Html.Action and @Html.RenderAction, we can use independent models in partial views. Now have a look that how partial views are called in corresponding view. The following code snippet for Employee Login partial view.
Get ASPHostPortal 15% discount with this promotional link
1 2 3 4 5 6 7 8 9 10 11 12 13 14 15 16 17 18 19 20 21 22 23 24 25 26 27 28 | @model EFOperation.Models.EmployeeLoginViewModel <section id="loginForm"> @using (Html.BeginForm("EmployeeLogin", "Employee", new { ReturnUrl = ViewBag.ReturnUrl }, FormMethod.Post, new { @class = "form-horizontal", role = "form" })) { @Html.AntiForgeryToken() <h4>Use a local account to log in.</h4> <hr /> <div class="form-group"> @Html.LabelFor(m => m.Email, new { @class = "col-md-2 control-label" }) <div class="col-md-10"> @Html.TextBoxFor(m => m.Email, new { @class = "form-control" }) </div> </div> <div class="form-group"> @Html.LabelFor(m => m.Password, new { @class = "col-md-2 control-label" }) <div class="col-md-10"> @Html.PasswordFor(m => m.Password, new { @class = "form-control" }) @Html.ValidationMessageFor(m => m.Password) </div> </div> <div class="form-group"> <div class="col-md-offset-2 col-md-10"> <input type="submit" value="Log in" class="btn btn-default" /> </div> </div> } </section> |
The following code snippet for Employee registration view.
1 2 3 4 5 6 7 8 9 10 11 12 13 14 15 16 17 18 19 20 21 22 23 24 25 26 27 28 29 30 31 32 33 34 35 36 37 | @model EFOperation.Models.EmployeeViewModel @using (Html.BeginForm("EmployeeRegistration", "Employee", FormMethod.Post, new { @class = "form-horizontal", role = "form" })) { <h4>Create a new account.</h4> <hr /> <div class="form-group"> @Html.LabelFor(m => m.Name, new { @class = "col-md-2 control-label" }) <div class="col-md-10"> @Html.TextBoxFor(m => m.Name, new { @class = "form-control" }) </div> </div> <div class="form-group"> @Html.LabelFor(m => m.Email, new { @class = "col-md-2 control-label" }) <div class="col-md-10"> @Html.TextBoxFor(m => m.Email, new { @class = "form-control" }) </div> </div> <div class="form-group"> @Html.LabelFor(m => m.Password, new { @class = "col-md-2 control-label" }) <div class="col-md-10"> @Html.PasswordFor(m => m.Password, new { @class = "form-control" }) </div> </div> <div class="form-group"> @Html.LabelFor(m => m.ConfirmPassword, new { @class = "col-md-2 control-label" }) <div class="col-md-10"> @Html.PasswordFor(m => m.ConfirmPassword, new { @class = "form-control" }) </div> </div> <div class="form-group"> <div class="col-md-offset-2 col-md-10"> <input type="submit" class="btn btn-default" value="Register" /> </div> </div> } |
Now we call both partial views with help of @Html.Action and @Html.RenderAction in main index view. The following code snippet is for the same.
1 2 3 4 5 6 7 8 9 10 11 12 13 14 | @{ ViewBag.Title = "Index"; } <div class="row"> <div class="col-lg-6"> @Html.Action("EmployeeLogin") </div> <div class="col-lg-6"> @{Html.RenderAction("EmployeeRegistration");} </div> </div> |
Now run the application and we get the same result as figure 2.