CheapASPNETHostingReview.com | Best and cheap ASP.NET hosting. In this article I am going to explain toyou about Google Maps and how to integrate it to search any location in ASP.NET. Google Maps is a Web-based service that provides detailed information about geographical regions and sites around the world.
Nowadays Google Maps is used in every application for various requirements. Here in this article I am going to discuss how to integrate Google Maps to search any location in ASP.NET.
First of all, to integrate Google Maps create a new project in Visual studio. Add a new webform as follows.
Design the webform as in the following:
Add the following script in the head section
1
2
3
4
5
6
7
8
9
10
11
12
13
14
15
16
17
18
19
20
21
22
23
24
25
26
27
28
29
30
31
32
33
34
35
36
37
38
<head runat="server">
<title></title>
<!DOCTYPE link href="https://maps/documentation/javascript/examples/default.css"rel="stylesheet"/>
CheapASPNETHostingReview.com | Best and cheap ASP.NET hosting. “Creating a mathematical expression evaluator is one of the most interesting exercises in computer science, whatever the language used. This is the first step towards really understanding what sort of magic is hidden behind compilers and interpreters….“.
I agree completely, and hope that you do too.
Using the CalcEngine class
The CalcEngine class performs two main tasks:
Parses strings that contain formulas into Expression objects that can be evaluated.
Evaluates Expression objects and returns the value they represent.
To evaluate a string that represents a formula, you call the CalcEngine.Parse method to get an Expression, then call the Expression.Evaluate method to get the value. For example:
1
2
3
varce=newCalcEngine();
varx=ce.Parse("1+1");
varvalue=(double)x.Evaluate();
Alternatively, you can call the CalcEngine.Evaluate method directly. This parses the string into an expression, evaluates the expression, and returns the result. For example:
1
2
varce=newCalcEngine();
varvalue=(double)ce.Evaluate("1+1");
The advantage of the first method is that it allows you to store the parsed expressions and re-evaluate them without re-parsing the same string several times. However, the second method is more convenient, and because the CalcEngine has a built-in expression cache, the parsing overhead is very small.
Functions
The CalcEngine class implements 69 functions, selected from Excel’s over 300. More functions can be added easily using the RegisterFunction method.
RegisterFunction takes a function name, the number of parameters (minimum and maximum), and a delegate that is responsible for evaluating the function. For example, the “atan” function is implemented as follows:
1
2
3
4
5
6
7
varce=newCalcEngine();
ce.RegisterFunction("ATAN2",2,Atan2);
staticobjectAtan2(List<Expression>p)
{
returnMath.Atan2((double)p[0],(double)p[1]);
}
Function names are case-insensitive (as in Excel), and the parameters are themselves expressions. This allows the engine to calculate expressions such as “=ATAN(2+2, 4+4*SIN(4))”.
The CalcEngine class also provides a Functions property that returns a dictionary containing all the functions currently defined. This can be useful if you ever need to enumerate remove functions from the engine.
Notice how the method implementation listed above casts the expression parameters to the expected type (double). This works because the Expression class implements implicit converters to several types (string, double, bool, and DateTime). I find that the implicit converters allow me to write code that is concise and clear.
If you don’t like implicit converters, the alternative would be to override ToString in the Expression class and add ToDouble, ToDateTime, ToBoolean, etc.
Variables: Binding to simple values
Most calculation engines provide a way for you to define variables which can be used in expressions. The CalcEngine class implements a Variables dictionary that associates keys (variable names) and values (variable contents).
For example, the code below defines a variable named angle and calculates a short sine table:
1
2
3
4
5
6
7
8
9
10
11
12
13
14
15
16
17
18
19
20
21
// create the CalcEngine
varce=newCalcEngine.CalcEngine();
// calculate sin from 0 to 90 degrees
for(intangle=0;angle<=90;angle+=30)
{
// update value of "angle" variable
ce.Variables["angle"]=angle;
// calculate sine
varsin=ce.Evaluate("sin(angle * pi() / 180)");
// write it out
Console.WriteLine("sin({0}) = {1}",angle,sin);
}
// output:
sin(0)=0
sin(30)=0.5
sin(60)=0.866025403784439
sin(90)=1
Variables: Binding to CLR objects
In addition to simple values, the CalcEngine class implements a DataContext property that allows callers to connect a regular .NET object to the engine’s evaluation context. The engine uses Reflection to access the properties of the object so they can be used in expressions.
This approach is similar to the binding mechanism used in WPF and Silverlight, and is substantially more powerful than the simple value approach described in the previous section. However, it is also slower than using simple values as variables.
For example, if you wanted to perform calculations on an object of type Customer, you could do it like this:
1
2
3
4
5
6
// Customer class used as a DataContext
publicclassCustomer
{
publicstringName{get;set;}
publicdoubleSalary{get;set;}
publicList
CalcEngine supports binding to sub-properties and collections. The object assigned to the DataContext property can represent complex business objects and entire data models.
This approach makes it easier to integrate the calculation engine into the application, because the variables it uses are just plain old CLR objects. You don’t have to learn anything new in order to apply validation, notifications, serialization, etc.
Variables: Binding to dynamic objects
The original usage scenario for the calculation engine was an Excel-like application, so it had to be able to support cell range objects such as “A1” or “A1:B10”. This requires a different approach, since the cell ranges have to be parsed dynamically (it would not be practical to define a DataContext object with properties A1, A2, A3, etc).
To support this scenario, the CalcEngine implements a virtual method called GetExternalObject. Derived classes can override this method to parse identifiers and dynamically build objects that can be evaluated.
If the object returned implements the CalcEngine.IValueObject interface, the engine evaluates it by calling the IValueObject.GetValue method. Otherwise, the object itself is used as the value.
If the object returned implements the IEnumerable interface, then functions that take multiple values (such as Sum, Count, or Average) use the IEnumerable implementation to get all the values represented by the object.
For example, the sample application included with this article defines a DataGridCalcEngine class that derives from CalcEngine and overrides GetExternalObject to support Excel-style ranges. This is described in detail in a later section (“Adding Formula Support to the DataGridView Control”).
Optimizations
I mentioned earlier that the CalcEngine class performs two main functions: parsing and evaluating.
If you look at the CalcEngine code, you will notice that the parsing methods are written for speed, sometimes even at the expense of clarity. The GetToken method is especially critical, and has been through several rounds of profiling and tweaking.
For example, GetToken detects characters and digits using logical statements instead of the convenient char.IsAlpha or char.IsDigit methods. This does make a difference that shows up clearly in the benchmarks.
In addition to this, CalcEngine implements two other optimization techniques:
Expression caching
The parsing process typically consumes more time than the actual evaluation, so it makes sense to keep track of parsed expressions and avoid parsing them again, especially if the same expressions are likely to be used over and over again (as in spreadsheet cells or report fields, for example).
The CalcEngine class implements an expression cache that handles this automatically. The CalcEngine.Evaluate method looks up the expression in the cache before trying to parse it. The cache is based on WeakReference objects, so unused expressions eventually get removed from the cache by the .NET garbage collector. (This technique is also used in the NCalc library.)
Expression caching can be turned off by setting the CalcEngine.CacheExpressions property to false.
Expression optimization
After a string has been parsed, the resulting expression can sometimes be optimized by replacing parts of the expression that refer only to constant values. For example, consider the expression:
1
{4*(4*ATAN(1/5.0)-ATAN(1/239.0))+A+B}
This expression contains several constants and functions of constants. It can be simplified to:
1
{3.141592654+A+B}
This second expression is equivalent to the first, but can be evaluated much faster.
Expression simplification was surprisingly easy to implement. It consists of a virtual Expression.Optimize method that is called immediately after an expression is parsed.
The base Expression class provides an Optimize method that does nothing:
1
2
3
4
5
6
7
classBinaryExpression:Expression
{
publicvirtual Expression Optimize()
{
returnthis;
}
...
This simply allows all derived classes that derive from Expression to implement their own optimization strategy.
For example, the BinaryExpression class implements the Optimize method as follows:
1
2
3
4
5
6
7
8
9
10
11
12
classBinaryExpression:Expression
{
publicoverride Expression Optimize()
{
_lft=_lft.Optimize();
_rgt=_rgt.Optimize();
return_lft._token.Type==TKTYPE.LITERAL&&
_rgt._token.Type==TKTYPE.LITERAL
?newExpression(this.Evaluate())
:this;
}
..
The method calls the Optimize method on each of the two operand expressions. If the resulting optimized expressions are both literal values, then the method calculates the result (which is a constant) and returns a literal expression that represents the result.
To illustrate further, function call expressions are optimized as follows:
1
2
3
4
5
6
7
8
9
10
11
12
13
14
15
16
17
18
19
20
21
22
classFunctionExpression:Expression
{
publicoverride Expression Optimize()
{
boolallLits=true;
if(_parms!=null)
{
for(inti=0;i<_parms.Count;i++)
{
varp=_parms[i].Optimize();
_parms[i]=p;
if(p._token.Type!=TKTYPE.LITERAL)
{
allLits=false;
}
}
}
returnallLits
?newExpression(this.Evaluate())
:this;
}
...
First, all parameters are optimized. Next, if all optimized parameters are literals, the function call itself is replaced with a literal expression that represents the result.
Expression optimization reduces evaluation time at the expense of a slight increase in parse time. It can be turned off by setting the CalcEngine.OptimizeExpressions property to false.
Globalization
The CalcEngine class has a CultureInfo property that allows you to define how the engine should parse numbers and dates in expressions.
By default, the CalcEngine.CultureInfo property is set to CultureInfo.CurrentCulture, which causes it to use the settings selected by the user for parsing numbers and dates. In English systems, numbers and dates look like “123.456” and “12/31/2011”. In German or Spanish systems, numbers and dates look like “123,456” and “31/12/2011”. This is the behavior used by Microsoft Excel.
If you prefer to use expressions that look the same on all systems, you can set the CalcEngine.CultureInfo property to CultureInfo.InvariantCulture for example, or to whatever your favorite culture happens to be.
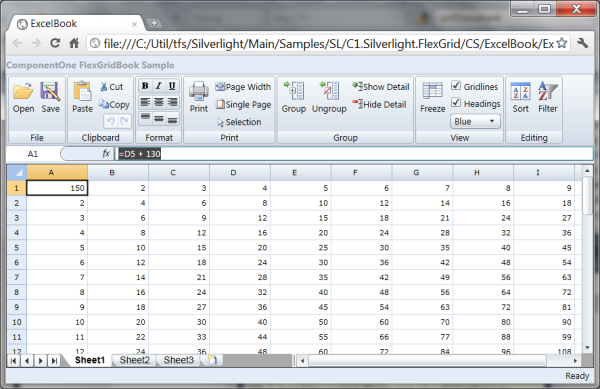
Sample: A DataGridView control with formula support
The sample included with this article shows how the CalcEngine class can be used to extend the standard Microsoft DataGridView control to support Excel-style formulas. The image at the start of the article shows the sample in action.
Note that the formula support described here is restricted to typing formulas into cells and evaluating them. The sample does not implement Excel’s more advanced features like automatic reference adjustment for clipboard operations, selection-style formula editing, reference coloring, and so on.
The DataGridCalcEngine class
The sample defines a DataGridCalcEngine class that extends CalcEngine with a reference to the grid that owns the engine. The grid is responsible for storing the cell values which are used in the calculations.
The DataGridCalcEngine class adds cell range support by overriding the CalcEngine.GetExternalObject method as follows:
1
2
3
4
5
6
7
8
9
10
11
12
13
14
15
16
17
18
19
20
21
22
23
24
25
26
27
28
29
30
/// &lt;summary>
/// Parses references to cell ranges.
/// &lt;/summary>
/// &lt;param name="identifier">String representing a cell range
/// (e.g. "A1" or "A1:B12".&lt;/param>
/// &lt;returns>A &lt;see cref="CellRange"/> object that represents
The method analyzes the identifier passed in as a parameter. If the identifier can be parsed as a cell reference (e.g., “A1” or “AZ123:XC23”), then the method builds and returns a CellRangeReference object. If the identifier cannot be parsed as an expression, the method returns null.
The CellRangeReference class is implemented as follows:
The CellRangeReference class implements the IValueObject interface to return the value in the first cell in the range. It does this by calling the owner grid’s Evaluate method.
The CellRangeReference also implements the IEnumerable interface to return the value of all cells in the range. This allows the calculation engine to evaluate expressions such as “Sum(A1:B10)”.
Notice that the GetValue method listed above uses an _evaluating flag to keep track of ranges that are currently being evaluated. This allows the class to detect circular references, where cells contain formulas that reference the cell itself or other cells that depend on the original cell.
The DataGridCalc class
The sample also implements a DataGridCalc class that derives from DataGridView and adds a DataGridCalcEngine member.
To display formula results, the DataGridCalc class overrides the OnCellFormatting method as follows:
The method starts by retrieving the value stored in the cell. If the cell is not in edit mode, and the value is a string that starts with an equals sign, the method uses CalcEngine to evaluate the formula and assigns the result to the cell.
If the cell is in edit mode, then the editor displays the formula rather than the value. This allows users to edit the formulas by typing into in the cells, just like they do in Excel.
If the expression evaluation causes any errors, the error message is displayed in the cell.
At this point, the grid will evaluate expressions and show their results. But it does not track dependencies, so if you type a new value into cell “A1” for example, any formulas that use the value in “A1” will not be updated.
To address this, the DataGridCalc class overrides the OnCellEditEnded method to invalidate the control. This causes all visible cells to be repainted and automatically recalculated after any edits.
Let’s not forget that implementation of the Evaluate method used by the CellRangeReference class listed earlier. The method starts by retrieving the cell content. If the content is a string that starts with an equals sign, the method evaluates it and returns the result; otherwise it returns the content itself:
That is all there is to the DataGridCalc class. Notice that calculated values are never stored anywhere . All formulas are parsed and evaluated on demand.
The sample application creates a DataTable with 50 columns and 50 rows, and binds that table to the grid. The table stores the values and formulas typed by users.
The sample also implements an Excel-style formula bar across the top of the form that shows the current cell address, content, and has a context menu that shows the functions available and their parameters.
Finally, the sample has a status bar along the bottom that shows summary statistics for the current selection (Sum, Count, and Average, as in Excel 2010). The summary statistics are calculated using the grid’s CalcEngine as well.
Testing
I built some testing methods right into the CalcEngine class. In debug builds, these are called by the class constructor:
1
2
3
4
5
6
7
8
9
10
publicCalcEngine()
{
_tkTbl=GetSymbolTable();
_fnTbl=GetFunctionTable();
_cache=newExpressionCache(this);
_optimize=true;
#if DEBUG
this.Test();
#endif
}
This ensures that tests are performed whenever the class is used (in debug mode), and that derived classes do not break any core functionality when they override the base class methods.
The Test method is implemented in a Tester.cs file that extends the CalcEngine using partial classes. All test methods are enclosed in an #if DEBUG/#endif block, so they are not included in release builds.
This mechanism worked well during development. It helped detect many subtle bugs that might have gone unnoticed if I had forgotten to run my unit tests when working on separate projects.
Benchmarks
While implementing the CalcEngine class, I used benchmarks to compare its size and performance with alternate libraries and make sure CalcEngine was doing a good job. A lot of the optimizations that went into the CalcEngine class came from these benchmarks.
I compared CalcEngine with two other similar libraries which seem to be among the best available. Both of these started as CodeProject articles and later moved to CodePlex:
NCalc: This is a really nice library, small, efficient, and feature-rich. I could not use NCalc in my Silverlight project because it relies on the ANTLR runtime DLL, which cannot be used in Silverlight projects (at least I couldn’t figure out how to do it).
Flee: Unlike CalcEngine and NCalc, Flee keeps track of formulas, their values, and dependencies. When a formula changes, Flee re-evaluates all cells that depend on it. One of the interesting features of Flee is that it actually compiles formulas into IL. This represents a trade-off since compilation is quite slow, but evaluation is extremely fast. I decided not to use Flee in my Silverlight project because it is relatively large and the parsing times were too long for the type of application I had in mind.
The benchmarking method was similar to the one described by Gary Beene in his 2007 Equation Parsers article. Each engine was tested for parsing and evaluating performance using three expressions. The total time spent was used to calculate a “Meps” (million expressions parsed or evaluated per second) index that represents the engine speed.
The expressions used were the following:
1
2
3
4*(4*Atan(1/5.0)-Atan(1/239.0))+a+b
Abs(Sin(Sqrt(a*a+b*b))*255)
Abs(Sin(Sqrt(a^2+b^2))*255)
Where “a” and “b” are variables set to 2 and 4.
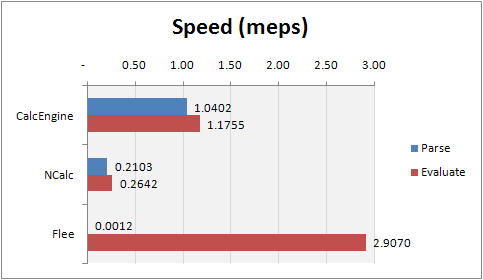
Each engine parsed and evaluated the expressions 500,000 times. The times were added and used to calculate the “Meps” index by dividing the number of repetitions by the time consumed. The results were as follows:
Time in seconds
Speeds in “Meps”
Library
Parse
Evaluate
Parse
Evaluate
CalcEngine
1.4
1.3
1.04
1.18
NCalc
7.1
5.7
0.21
0.26
Flee
1,283.0
0.5
0.00
2.91
CalcEngine*
10.7
1.5
0.14
0.99
NCalc*
145.2
5.7
0.01
0.27
Some comments about the benchmark results:
CalcEngine performed well, being the fastest parser and the second fastest evaluator (after Flee).
Flee is literally “off the charts” on both counts, almost 900 times slower parsing and 2.5 times faster evaluating than CalcEngine. Because Flee compiles formulas to IL, I expected slow parsing and fast evaluation, but the magnitude of the difference was surprising.
Entries marked with asterisks were performed with optimizations off. They are included to demonstrate the impact of the optimization options.
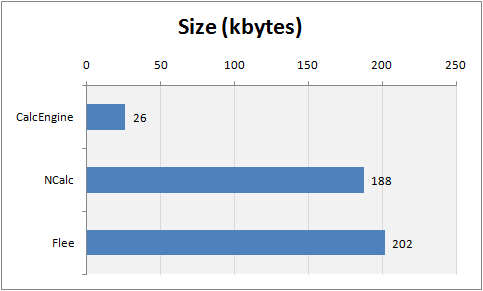
In addition to speed, size is important, especially for Silverlight applications that need to be downloaded to the client machine. Here is a comparison of library sizes:
Library
Size (kB)
CalcEngine
26
NCalc
188
Flee
202
CalcEngine is the smallest library by far, more than seven times smaller than NCalc. If necessary, it could be trimmed even further by removing some of the less important built-in functions.
Conclusion
The CalcEngine class is compact, fast, extensible, and multi-platform. I think it is different enough from NCalc and Flee to add value for many types of projects, especially Silverlight applications like the one it was created for. You can see the Silverlight app in action in the image below.
I hope others will find CalcEngine useful and interesting as well.
CheapASPNETHostingReview.com | Best and cheap ASP.NET Core 1.0 hosting. The Web.Config is gone and the AppSettings are gone with ASP.NET Core 1.0. How do we configure our ASP.NET Core Application now? With the Web.Config, also the config transform feature is gone. How do we configure a ASP.NET Core Application for specific deployment environments?
Configuring
Unfortunately a newly started ASP.NET Core Application doesn’t include a complete configuration as a sample. This makes the jump-start a little difficult. The new Configuration is quite better than the old one and it would make sense to add some settings by default. Anyway, lets start by creating a new Project. Open the Startup.cs and take a look at the controller. There’s already something like a configuration setup. This is exactly what the newly created application needs to run.
1
2
3
4
5
6
7
8
9
10
11
12
13
14
publicStartup(IHostingEnvironment env)
{
// Set up configuration sources.
varbuilder=newConfigurationBuilder()
.AddJsonFile("appsettings.json")
.AddEnvironmentVariables();
if(env.IsDevelopment())
{
// This will push telemetry data through Application Insights
// pipeline faster, allowing you to view results immediately.
But in the most cases you need much more configuration. This code creates a ConfigurationBuilder and adds a appsettigns.json and environment variables to the ConfigurationBuilder. In development mode, it also adds ApplicationInsights settings. If you take a look into the appsettings.json, you’ll only find a ApplicationInsights key and some logging specific settings (In case you chose a individual authentication you’ll also
see a connection string:
1
2
3
4
5
6
7
8
9
10
11
12
13
{
"ApplicationInsights":{
"InstrumentationKey":""
},
"Logging":{
"IncludeScopes":false,
"LogLevel":{
"Default":"Verbose",
"System":"Information",
"Microsoft":"Information"
}
}
}
Where do we need to store our custom application settings? We can use this appsettings.json or any other JSON file to store our settings. Let’s use the existing one to add a new section called AppSettings:
This looks nice, but how do we read this settings?
In the Startup.cs the Configuration is already built and we could use it like this:
var configurationSection = Configuration.GetSection(“AppSettings”);
var title = configurationSection.Get<string>(“ApplicationTitle”);
var topItmes = configurationSection.Get<int>(“TopItemsOnStart”);
var showLink = configurationSection.Get<bool>(“ShowEditLink”); We can also provide a default value in case that item doesn’t exist or in case it is null
var topItmes = configurationSection.Get<int>(“TopItemsOnStart”, 15);
To use it everywhere we need to register the IConfigurationRoot to the dependency injection container:
But this seems not to be a really useful way to provide the application settings to our application. And it looks almost similar as in the previous ASP.NET Versions. But the new configuration is pretty much better. In previous versions we created a settings facade to encapsulate the settings, to not access the configuration directly and to get typed settings. No we just need to create a simple POCO to provide access to the settings globally inside the application:
1
2
3
4
5
6
publicclassAppSettings
{
publicstringApplicationTitle{get;set;}
publicintTopItemsOnStart{get;set;}
publicboolShowEditLink{get;set;}
}
The properties of this class should match the keys in the configuration section. Is this done we are able to map the section to that AppSettings class:
This fills our AppSettings class with the values from the configuration section. This code also adds the settings to the IoC container and we are now able to use it everywhere in the application by requesting for the IOptions<AppSettings>:
With this approach, you are able to create as many configuration sections as you need and you are able to provide as many settings objects as you need to your application. What do you think about it? Please let me know and drop a comment.
Environment specific configuration
Now we need to have differnt configurations per deployment environment. Let’s assume we have a production, a staging and a development environment where we run our application. All this environments need another configuration, another connections string, mail settings, Azure access keys, whatever… Let’s go back to the Startup.cs to have a look into the constructor. We can use the IHostingEnvironment to load different appsettings.json files per environment. But we can do this in a pretty elegant way:
We can just load another JSON file with an environment specific name and with optional set to true. Let’s say the appsettings.json contain the production and the default
settings and the appsettings.Staging.json contains the staging sepcific settings. It we are running in Staging mode, the second settings file will be loaded and the existing settings will be overridden by the new one. We just need to sepcify the settings we want to override.
Setting the flag optional to true means, the settings file doesn’t need to exist. Whith this approatch you can commit some default setings to the source code repository and the top secret access keys and connections string, could be stored in an appsettings.Development.json, an appsettings.staging.json and an appsettings.Production.json on the buildserver or on the webserver directly.
Conclusion
As you can see, configuration in ASP.NET Core is pretty easy. You just need to know how to do it. Because it is not directly visible in a new project, it is a bit difficult to find the way to start.
CheapASPNETHostingReview.com | Best and cheap ASP.NET Hosting. Sometimes we need to provide backup and restore facility in ASP.NET application in application’s control panel. In this article, I am going to explain how to develop a database backup and restore application in ASP.NET. I have taken example of SQL Server in this article however, this application can be used to backup and restore any database that .NET supports. You just need to change their provider instead of System.Data.SqlClient and a single SQL Statement to list the table names of the database. I will explain them in details later in this article.
My Backup and Restore web application looks like below:
1. Create a UI for database backup and restore
In this step, let us create a simple UI in ASP.NET to list all the database tables in the ListBox control that let the end user select the table to take backup and restore. Also put two buttons named Backup and Restore to do its respective functionality. My code for above UI looks like below:
2. Populate the database table in the ListBox control
In this step, we will write method that will populate all database tables in the ListBox control that will let the end user select the table to perform Backup or Restore. My code looks like below:
You can notice in the above code snippet, I am calling a method named PopulateDatabaseTables() in the Not IsPostBack condition under Page_Load event that will populate all the tables of the database in the ListBox control. Notice the select statement that has been stored into sql variable. This select statement varies between databases to databases. To list all the tables in SQL Server database, you need to use above select statement. To list all the tables of the MySQL database, you need to write “show tables” in place of above select statement. Of course, you need to change the provider as well to connect to the MySQL database.
3. Code for taking backup of the selected table
In this step, we shall write code to take backup of the selected table when Backup button will be clicked. You can see that in OnClick event of the Backup button, I have specified BackupNow method. Let us see the code for this method.
lblMessage.Text="Backup for table <b>"+tableName+"</b> successful!";
}
}
In the above code snippet, I have got the selected table name form ListBox in the tableName variable. Selected all records from that table and filled into a DataSet named dSetBackup. Later on I used WriteXml method of DataSet to write the contents of the selected table in an xml file. The name of the xml file will be the table name in my case and will be placed in the backup folder. Then I have written a success message. This way your end user will be able to take backup of all the tables in the database.
4. Code for restoring selected table
In this step, we shall see how to restore a selected table into the database once the Restore button will be clicked. Notice the Restore button where I have specified RestoreNow method in the OnClick event. The code for this method looks like below:
// Loop through all rows of the selected table and add into dSetBackup DataSet
foreach(DataRow row indSet.Tables[0].Rows)
{
dSetBackup.Tables[0].NewRow();
dSetBackup.Tables[0].Rows.Add(row.ItemArray);
}
// Create a command builder to update dSetBackup DataSet
SqlCommandBuilder cmd=newSqlCommandBuilder(dAd);
// Following update command will push all added rows of dSetBackup DataSet into the database
dAd.Update(dSetBackup,tableName);// We are done !!!
}
}
lblMessage.Text="Restore of table <b>"+tableName+"</b> successful!";
}
}
}
Please note that in order to above code snippet work, you must have the schema in place into the Restore database. This schema must match the original database schema from which you had taken backup otherwise your restore will not work.
In the above code snippet, I am first getting the connection string of the database where we need to restore the data. Then I am getting the schema of the selected table into the dSetBackup DataSet using dAd (SqlDataAdapter), as there will not be any row into the restore database, so it will only give the schema of the table. This will help us to push the backed up data into this DataSet. In the next line, I have read the backed up xml of the table using ReadXml method of the DataSet that will get all the backed up data for that table into the dSet DataSet. In next line, I am looping through every rows of the dSet DataSet table and adding them into our dSetBackup DataSet. Next, I have created a SqlCommandBuilder object for the SqlDataAdapter. This will internally build insert, update, delete statement for the dSetBackup DataTable. In the following line, I have used dAd.Update (SqlDataAdapter update method) to push the data into the restore database. At last I am writing the success message. Simple! Isn’t it?
CheapASPNETHostingReview.com | Best and Cheap ASPNET Hosting. In this post I will explains tips to choose the best and Cheap ASP.NET hosting companies.
How To choose the best and cheap ASP.NET hosting company, there are hundreds of web hosting company on the internet and choosing any one of them for your ASP.NET hosting needs can be quite difficult, you need to select a hosting company with best hosting plan that support for your bussines needs rather than creating roadblocks for your succes. The right plans means the ideal feature along with the required capacities. Afforability is also an important factor, but it should not come at the cost of quality service and features, so how to choose the right ASP.NET hosting plan and provider to meet your needs
In this post I would like to give you tips how to choose the best asp.net hosting company for your business. When you plan to run a blog, manage photos, host apps and much more, the first thing you need to do is looking for a good web hosting company. A good web host offers you the tools, bandwidth, and storage you need. Besides, it should also provide technical support for you to solve some issues. To choose a good web hosting company, you need to consider the following tips :
Choosing The Best and Cheap ASP.NET Hosting Company
Features
The feature of the web hosting service is also important. A good web hosting company should provide enough server resources to customers, including disk space, band width, databases, hosted domains, etc. Meanwhile, multiple scripting languages should be supported. Some important features that a good web hosting company should have are listed as below Plesk panel is another critical factor you should take into consideration. A good control panel can help you all manage hosting accounts, including files, databases, websites, email accounts, domains and so on. Many web hosting companies including ASPHostPortal.com are favor of Plesk panel, which is well known for its user-friendly interface and comprehensive tools. Additionally, some web hosting companies provide one-click installer to help users install the applications in a simple way.
Price
Before knowing other aspects of a web host, the first thing you should take into consideration is the price of a web hosting service. It is necessary to have a basic understanding about the regular price, discounted price or discounts of the web hosting service, which help you choose the most affordable one to run the business. Generally, web hosts price shared web hosting under $10/mo, such as the ASPHostPortal ASP.NEThosting is starting at $5.00/mo with free domain and double SQL space promotionally. In addition, some web hosts offer advertising credits or free domains to their customers, which is also a good method to save money.
Uptime & Speed
Every web host promise to offer 99% uptime guarantee, but only a few of them achieve the guarantee in practice. A good web hosting company should utilize high performance servers to ensure reliable and secure hosting environment, which barely has unplanned downtime issues. Besides, a 24×7 server monitoring should be available. Hosting speed determines how fast you web pages are loaded. A good web host can provide a fast hosting environment and ensure that their data can be transferred at a high speed. And also, a 24×7 server monitoring is essential to address their issues promptly.
Technical Support
When choosing a web hosting company, you need to consider whether it offers a customer support. A good web host should allow customers contact the professional support team via various communication channels, such as live chat, and email, which are available 24 hours a day, 7 days a week to make sure customers can have an immediate solution to their issues. Besides, many online resources should be available to customers, including knowledgebase, forum, ticket system, tutorials, and much more, which ensure customers have a better hosting environment.
Customer Satisfaction Rate
Generally, good web hosting companies always have high reputation in community and high customer satisfaction rate among customers. To have a better understanding about the company, you require browsing a large amount of customer reviews to know whether the customers are satisfied the company. You should choose a company which has a favorable reception among customers.
NOTE :” On the basis of the tips above, you can charge what kind of web hosting company is suitable for running your business. After a comprehensive consideration, you should choose a company which provides you excellent service, affordable price, professional support and acquire a good reputation among customers. With guidance like this article, you’re able to start your own business right now”.
CheapASPNETHostingReview.com | If you create a new MVC 6 project from the default starter template, it will contain the following code in the Startup class, under ConfigureServices method:
How to Migrating From ASP.NET Web API 2 to MVC 6
1
2
3
// Uncomment the following line to add Web API servcies which makes it easier to port Web API 2 controllers.
// You need to add Microsoft.AspNet.Mvc.WebApiCompatShim package to project.json
// services.AddWebApiConventions();
This pretty much explains it all – the Compatibility Shim is included in an external package, Microsoft.AspNet.Mvc.WebApiCompatShim and by default is switched off for new MVC projects. Once added and enabled, you can also have a look at the UseMvc method, under Configure. This is where central Web API routes can be defined:
1
2
3
4
5
6
7
8
9
app.UseMvc(routes=>
{
routes.MapRoute(
name:"default",
template:"{controller}/{action}/{id?}",
defaults:new{controller="Home",action="Index"});
// Uncomment the following line to add a route for porting Web API 2 controllers.
While it is obviously not 100% identical to the ApiController from Web API, it contains the majority of public proeprties and methods that you might have gotten used to – the Request property, the User property or a bunch of IHttpActionResult helpers.
Returning HttpResponseMessage
The shim introduces the ability to work with HttpResponseMessage in MVC 6 projects. How is this achieved? First of all, the Microsoft.AspNet.WebApi.Client package is referenced, and that brings in the familiar types – HttpResponseMessage and HttpRequestMessage.
On top of that, an extra formatter is injected into your application – HttpResponseMessageOutputFormatter. This allows you to return HttpResponseMessage from your actions, just like you were used to doing in Web API projects!
How does it work under the hood? Remember, in Web API, returning an instance of HttpResponseMessage bypassed content negotiation and simply forwarded the instance all the way to the hosting layer, which was responsible to convert it to a response that was relevant for a given host.
In the case of MVC 6, the new formatter will grab your HttpResponseMessage and copy its headers and contents onto the Microsoft.AspNet.Http.HttpResponse which is the new abstraction for HTTP response in ASP.NET 5.
As a result such type of an action as the one shown below, is possible in MVC 6, and as a consequence it should be much simpler to migrate your Web API 2 projects.
The shim introduces an HttpRequestMessageModelBinder which allows the same thing to be done under MVC 6. As a result, if you relied on HttpRequestMessage binding in Web API, your code will migrate to MVC 6 fine.
How does it work? The shim will use an intermediary type, HttpRequestMessageFeature, to create an instance of HttpRequestMessage from the ASP.NET 5 HttpContext.
HttpRequestMessage extensions
Since it was very common in the Web API world to use HttpResponseMessage as an action return type, there was a need for a mechanism that allowed easy creation of its instances. This was typically achieved by using the extension methods on the HttpRequestMessage, as they would perform content negotiation for you.
HttpError
If you use/used the CreateErrorResponse method mentioned above, you will end up relying on the HttpError class which is another ghost of the Web API past rejuvenated by the compatibility shim.
HttpError was traditionally used by Web API to serve up error information to the client in a (kind of) standardized way. It contained properties such as ModelState, MessageDetail or StackTrace.
It was used by not just the CreateErrorResponse extension method but also by a bunch of IHttpActionResults – InvalidModelStateResult, ExceptionResult and BadRequestErrorMessageResult. As a result, HttpError is back to facilitate all of these types.
CheapASPNETHostingReview.com | Best and cheap ASP.NET Hosting. Today In this post I will explains the difference between the Classic ASP and ASP.Net and also focuses on the new features in ASP.NET. Let’s discuss the differences between these two in detail:
Process Isolation
ASP is running under the inetinfo.exe (IIS) process space and hence susceptible to application crashes due to that the IIS needs to be stopped or restarted. ASP is related to the process isolation setting in IIS. Where as, ASP.Net process is separate from inetinfo.exe (IIS process). Though the entry point into a ASP.Net application is still IIS but it is not related to the IIS process isolation settings.
Non-MS Platform Support
Classical ASP has no mechanism of running itself on non- Microsoft technology platforms like the “The Apache Web Server” (there are some third party products, like ChiliSoft) but, ASP.NET could be run on non- Microsoft Platforms also. Cassini is a sample Web server produced by Microsoft which, among other projects, has been used to host ASP.NET with Apache.
Multi Language Support in WebPage
Only VBScript and Javascript were available for scripting in ASP where as, in ASP.NET there are no such restrictions. The .NET compliant language can be used with ASP.NET including several like C# and VB.NET, where both of them are server-sided languages.
Interpretation Vs Compilation
In ASP, an interpreter like Jscript or VBScript is used to execute the server-side code. When an ASP page is requested, the text of that page is parsed linearly. The content that is not server-side script is passed back as it is to the response. Where as, the server-side script in the page is executed through the appropriate interpreter, and the output is then submitted back to the response. The efficiency of page rendering is affected by this architecture in several ways. Firstly, on the go interpreting of the server-side script. A common optimization for the ASP applications for this side affect is to move a mass of server-side script into precompiled COM components to improve the response time. Secondly, the intermingling server-side evaluation blocks with static HTML is another efficiency concern. It is less efficient than the evaluating a single server-side blocks because the interpreter has to be invoked time and again.
As a rescue, many ASP developers resort to large blocks of server-side script for replacing static HTML elements with Response.Write() invocations instead. Eventually, this ASP model permits the inclusion of different blocks of scripts within a page to be written in different script languages. This may appeal in some ways but it also reduces performance by requiring that a particular page load both scripting engines to process a request that consumes more time and memory if compared to just using one language.
But in ASP.NET, the pages are always compiled into .Net classes housed within assemblies. This class includes both the server-side code and static HTML, so when the page is accessed for the first time, subsequent rendering of that page is serviced by executing the compiled code. All the inefficiencies of the scripting model of traditional ASP are eliminated by this. No longer had any performance difference between compiled components and server-side code embedded within a page observed. Both of them are compiled assemblies now. Also, no performance difference between interspersing server-side code blocks among static HTML elements and writing large blocks of server side code and using Response.Write() for static HTML content. The .aspx file is parsed into a single code file and compiled, its not possible to use multiple
This eliminates all the inefficiencies of the scripting model of traditional ASP. There is no longer any performance difference between compiled components and server-side code embedded within a page they are now both compiled components. There is also no performance difference between interspersing server-side code blocks among static HTML elements, and writing large blocks of server-side code and using Response.Write() for static HTML content. Also, because the .aspx file is parsed into a single code file and compiled, it is not possible to use multiple server-side languages within a single .aspx file.
Debugging benefits
In classic ASP, debugging is a tough task because of limited support due to the interpreted model. In contrast, not only ASP.NET improves the performance over the interpreted model but also provides debugging tools for component developers and pages compiled into classes. The page errors are generated as compiled errors and there is a fir chance that most of them will be discovered at the compilation time instead of runtime due to the fact that VB.Net and C# are strongly typed languages. In addition to this, the tools available to the Windows Forms .Net developer are applicable to the ASP.NET developer.
Server-Side code placement Web Page
In ASP pages you might include the executable code outside the scope of a function within a script block marked as “runat=server” and you may also define a function within a pair of server side script tags. Where as in ASP.Net the former is no longer supported and the latter is also not possible.
A default constructor is provided by the generated class definition, and it would be a compiler error if you try to write a default constructor. For this, you can choose the alternative method of separating the layout from the page logic which consequently gives you a complete control over the class definition. This method is called code-behind.
Deployment Strategies
The components used by pages and deployed in this manner were difficult to update or replace in the Classic ASP. You are required to shutdown the IIS because of the fact that while the application was functioning, it referred to the component file for replacement. So, after taking your web server temporarily offline, you had to replace the file and then restart IIS. But, in ASP.NET it aimed to get rid of the need to stop the functioning Web application whenever the components needed to be updated or replaced.
To attain this, the designers of ASP.NET had to ensure two things: first, that the running application not hold a reference to the component file and second, that whenever the component file was replaced with a new version, that new version was picked up with any subsequent requests made to the application. Both of these goals are achieved by using the shadow copy mechanism provided by the Common Language Runtime (CLR).
New Page Directives
In ASP, the directives are required to be placed on the first line of a page within the same delimiting block. For instance:
1
<%LANGUAGE="VBSCRIPT"CODEPAGE="932"%>
While ASP.NET required you to place the Language directive with a Page directive, as follows:
It could be more than one directive lines, which depends on your need. The standard practice is to place the directives in the beginning of the file but you can place it anywhere in your .aspx file.
Threading Issues
The threading model of COM object created using VB within a web-based application is STA (Single Threaded Apartment). ASP worker thread resides in its own STA and hence the compatibility is fine in this case with a little performance hit.
But in ASP.NET, threading model is the Multiple Threaded Apartment (MTA). This means that components that you are using were created for the Single Threaded Apartment (STA) will no longer perform or function reliably without taking some extra precautions in ASP.NET. This includes, but is not limited to, all COM components that have been created using Visual Basic 6.0 and earlier versions. You will be glad to hear that you can still use these STA components without having to change any code. What you need to do is include the compatibility attribute aspcompat=true in a <%@Page> tag on the ASP.NET page. For example, <%@Page aspcompat=true Language=VB%>. Using this attribute will force your page to execute in STA mode, thus ensuring your component will continue to function correctly. If you attempt to use an STA component without specifying this tag, the run time will throw an exception. Setting this attribute to true will also allow your page to call COM+ 1.0 components that require access to the unmanaged ASP built-in objects. These are accessible via the ObjectContext object. If you set this tag to true, your performance will degrade slightly.
Validation & Browser scripting capabilities
There is no inbuilt facility for the validation of controls in the Classic ASP. For example, checking whether a textbox is left blank, or a combo is selected or not, or if a phone number does not fit a particular pattern for area etc.
These kinds of validations required the user to write the client side Javascript code.
It was not less than a headache for the developer to cater the client and server side validations.
What added to the burden on the developer was the Javascript code to fit a particular Browser. Specific code had to be written to fit a set of browsers and it consumed a lot of time.
But in ASP.NET, In built validation controls are provided which are easy to implement and the developer has to worry the least.
The features provided by ASP.NET validation controls:
Browser Independent coding: Developer does not have to worry about the browser and how controls would render to.
Client-Side or Server-Side: The Validation Controls manage the code checking if the client side code is disabled the validation is done on the server side.
Rich Validation set
There are few types of validation which cater to the needs of the validation requirements:
RequiredFieldValidation Control – Requires that the control not be left blank.
CompareValidator Control – Used to compare Data in Two Controls
RangeValidator Control – Used to check for Range validation (also supports various data Types – Date, string etc…)
RegularExpressionValidator Control – Used to check the complicated patterns in the user input.
CustomValidator Control – The final control we have included in ASP.NET is one that adds great flexibility to our validation abilities. We have a custom validator where we get to write out own functions and pass the control value to this function.
This control also provides Client side and server side validation of which the Server side validation could be a different function altogether.
Validation Summary
The validation summary control will collect all the error messages of all the non-valid controls and put them in a tidy list. The list can be either shown on the web page (as shown in the example above) or with a popup box.
Conclusion
Classic ASP goes a long way toward simplifying Web programming. It is demanding when it comes to writing a new DDL from the very beginning as compared with the easier task to write some HTML and mingle it with a script. But then Classic ASP is not fee of issues. The ASP pages are mass of unstructured code. It can be compared to the early days of BASIC programming, where achieving a task quickly was possible but the resultant code was often hard to follow. The object model of ASP has multiple inherent or global objects. For instance, for the generation of the content of an HTTP request, script code is written and the content is send to the client using the intrinsic Response object. In the guaranteed situations where only one client is involved in talking to your Web application, this isn’t much of a problem. But not many web applications guarantee this. And the reason for this is the way ASP is organized by these intrinsic objects.
ASP.Net improves the classic ASP. The same intrinsic objects still remain in ASP.Net and the scripting can be added anywhere on the page per you requirement. In fact, ASP.NET easily manages and runs most of the ASP pages with .aspx extension.
ASP.Net introduces a lot of new features. Like all the components within .Net, ASP.Net pages too are compiled into the assemblies, which give a performance and security edge. Further, it supports the usage of any .Net language. This means there is no restriction over the use of JavaScript or VB Script on your Web pages. Now, you have an option to use more structured languages.
ASP.Net opens up a whole new programming model with the blend and combination of Web forms, server-side controls, data binding, and Web services.
Web sites are unfortunately prone to security risks. And so are any networks to which web servers are connected. Setting aside risks created by employee use or misuse of network resources, your web server and the site it hosts present your most serious sources of security risk.
ASP.NET is an open-source server-sideweb application framework designed for web development to produce dynamic web pages. It was developed by Microsoft to allow programmers to build dynamic web sites, web applications and web services.
CheapASPNETHostingreview.com| Cheap and reliable ASP.NET hosting. To make things worse, ASP.NET and MVC traditionally had not much more built-in to offer than boring role checks. This lead to either unmaintainable code (hard coded role names and Authorize attributes) or complete custom implementations – or both.
In ASP.NET 5, a brand new authorization API is supposed to improve that situation – and IMHO – oh yes it does. Let’s have a look.
Overview
ASP.NET 5 supports two styles of authorization out of the box – policy-based and resource-based. Both styles are a substantial improvement over the current ASP.NET authorization features and reduce the need to write your own authorization attribute/filter/infrastructure – though this is still totally possible.
The new Authorize Attribute
My main gripe with the old attribute is that it pushes developers towards hard-coding roles (or even worse – names) into their controller code. It violates separation of concerns and leads to hard to maintain code with roles names sprinkled all over your code base.
Also – let’s face it – declarative, role-based security might be nice for demos but is nowhere near flexible enough to write anything but trivial applications.
The new Authorize attribute can still do role checks like this :
1
2
3
[Authorize(Roles="Sales")]
publicIActionResult DoSalesyStuff()
{/* .. */}
But this is mainly for backwards compatibility (the ability to check for names is gone). The more recommended pattern is to use so called authorization policies instead:
1
2
3
[Authorize("SalesOnly")]
publicIActionResult DoSalesyStuff()
{/* .. */}
Let’s have a look at policies next.
Policies & Requirements
Policies are a way to create re-usable authorization logic. Policies consist of one or more so called requirements. If all requirements of a policy are met, the authorization check is successful – otherwise it fails.
Policies are created using a policy builder, and the following snippet creates a very simple policy (aka “require authenticated users”) and sets that globally in MVC :
Under the covers, the AddAuthorization extension method also puts an IAuthorizationService (or more specifically the DefaultAuthorizationService) into the DI container. This class can be used to programmatically evaluate policies (amongst other things – more on that later).
To make the authorization service available – simply add it to e.g. a controller constructor:
RemarkChallengeResult can be used to trigger an “access denied” condition in MVC. The cookie middleware e.g. will translate that either into a redirect to a login page for anonymous users, or a redirect to an access denied page for authenticated users.
Remark 2 Since views in MVC 6 also support DI, you can inject the authorization service there as well. Some people like this approach to conditionally render UI elements.
This is a nice way to centralize authorization policies and re-use them throughout the application.
The only thing I don’t like about this approach is, that it pushes you towards using the claims collection as the sole data source for authorization decisions. As we all know, claims describe the identity of the user, and are not a general purpose dumping ground for all sorts of data – e.g. permissions.
It would be nice if one could use the DI system of ASP.NET to make further data source accessible in custom requirement. I’ve opened an issue for that – we’ll see what happens.
Resource-based Authorization
This is a new approach for ASP.NET and is inspired by the resource/action based approach that we had in WIF before (which was ultimately inspired by XACML). We also like that approach a lot, but the problem with the WIF implementation (and also ours) was always that due to the lack of strong typing, the implementation became messy quickly (or at least you needed a certain amount of discipline to keep it clean over multiple iterations).
The idea is simple – you identify resources that your application is dealing with – e.g. customers, orders, products (yawn). Then you write a so called handler for each of these resources where you express the authorization requirements in code.
You use requirements to express whatever action is supposed to be applied to the resource, and conclude with a success/failure, e.g.:
// implement authorization policy for customer resource
}
}
Operation requirements are built-in and can be used to model simple string-based actions – but you can also write your own, or derive from OperationAuthorizationRequirement.
You then register the resource handler with the DI system and can access it imperatively from within your controllers (using the above mentioned authorization service):
What I like about this approach is that the authorization policy has full strong typed access to the domain object it implements authorization for, as well as the principal. This is a huge improvement over the WIF API. It also makes it easy to unit test your controller without the authorization code – and even more importantly (at least for security guy) – it allows unit testing the authorization policy itself.
In addition, the resource handler can make full use of the DI system. That means we can inject access to arbitrary data stores. A very common use case is to use some sort of database to query permission tables or similar. This makes it very flexible.
Imagine a permission service that queries your authorization using some backing store (the _permissions variable):
CheapASPNETHostingReview.com| Cheap and reliable ASP.NET hosting. Looking for the best ASP.NET web hosting? What is ASP.NET? It is a web programming language that allows you to quickly create dynamic web pages and programs. You can use advanced methodologies to quickly connect to a database and dynamically create a web page. Most modern Windows hosting supports ASP.NET but some do it better than others. How can you find the best ASP.NET web hosting?
Most web hosts will provide you with a control panel to fully manage your ASP.NET web hosting, running on there Windows servers. The most popular Windows based control panels at the moment are the popular Parallels Plesk control panel and Helm which both allow you to manage all aspects of your ASP.NET based web applications.
Both Control Panels also provided you with access to the installed of Microsoft SQL Server, ensuring full integration between your ASP.NET applications and MS-SQL. From the online control panel you will be able to create and delete your remotely hosted databases, create users, set passwords and define permissions and security settings.
ASPHostPortal.com, a Microsoft Golden hosting partner has been offering well priced Windows and ASP.NET hosting plans for many years. Founded in 2008 and operated in New York, US ASPHostPortal.com has become an important resource for cutting-edge, high-value hosting solutions. The company also offers low priced enterprise-level hosting plans by focusing their resources on needs by ASP.NET Windows’s developers.
ASPHostPortal.com claims to be proud of their management staff who have years of experience working in web hosting industry. ASPHostPortal’s aim is to offer the best web hosting value to their clients by offering products and solution in an efficient and effective way.
This company supports almost all the latest ASP.NET technology and provides plenty of server resources for every hosting account. Below are the list of key features, but definitely it provides more:
Unlimited Website
Latest MS SQL Server 2012 R2
ASP.NET 4.5.1/4.5/3.5/2.0
IIS 8 with Full trust allowed
SmarterMail email System
Web-based Plesk Panel hosting
Unlimited FTP, Sub domains, mail boxes
PHP, MySQL 5 Database
This company owns two data centers, which located in Europe and the United States and Both data centers utilizes 100% DELL servers . ASPHostPortal guarantees 99.99% uptime and their Service Level Agreement is what guarantees to offer their customers a whole day credit for every one hour of service outage. They have a 30 day Anytime money back, meaning that if customers aren’t happy with their services within the first 30 days they will be granted a full refund.
ASPHostPortal acknowledges customer needs and offers 24/7/365 support through their support portal and email. Their support isn’t out-sourced and customers will receive in-house support from ASP.NET and Window experts. ASPHostPortal also offers a knowledge base of help articles via their faq, which is a good source of information.
CheapASPNETHostingReview.com | In this article, I will show you the steps needed to complete before launching your website. If you have created a website and want to launch it and also want it to crawl by Google, this article is for you.
Only writing the code for making a website does not close your task. We create website for a particular purpose, some of us create it for blogging, some of us create social networking site, some of us create e-commerce website. So, these websites has some purpose.
But I hope all of you want your website to be first on Google crawl. You want it to make it a number one website. So, here I am going to present some tips which should be done by you to launch your site on the internet.
The following are the steps which is required for your website to engage to multiple users and to come on top of website in Google search.
Sort and Simple Domain NameI hope you all know the domain name. Actually domain name is the identity of your website on the internet. It is always unique. For example:http://asphostportal.com So your domain name should be simple which can be pronounced easily. It should also be short so that it is easy to remember.
PerformanceNow a days, no one wants to wait for loading the website, so performance is a major concern if you are going to create a website. So, create faster website which loads within 3 to 4 seconds. If your site is slow no one would want it.
Favicon
Add favicon for your website, it is a sign or copyright of your site. It is a short form of your logo which is shown on the left side of tab.
Title
Your title should be SEO friendly and change for every page depending on the content of the page. Don’t use too much numeric character and hyphen or special character with title, since it is not easy to remember these characters.
Metadata
Metadata is an important part of your code; it should change for every page as per the content of the page. It contains the title, keyword, description and lots of other data which is required for your website for search. It makes your website SEO friendly.
This tells the search engine that this website contains these types of data.
Before making your website live check that is it opening with all the web browsers. You need to check some previous versions of browser because there is no guarante that all are using the latest browsers.
Check Content
You need to check grammar, spelling and syntax before making it live. If you are writing a blog, article or any content, it must not have wrong grammar and spelling.
Links
Check that all links are working or not. Try to check some unwanted links or modify the links to know what is happening. If someone uses wrong url then your site should show a proper message which should be user friendly. These are interconnected to each other.
JavaScript Check
Check your website; if one of the web browser disabled the javascript, in that case check how your site is behaving.
ALT tag
Always use alt tag with images and media files, because sometimes for network related issue your site does not open properly, then instead of images and media files your alt tag content should be shown to user.
Check Validation
Before making your website live check all the validations which is attached to the form on the website like it can be a contact us page, comment section, etc. Check if all validations are working fine or not.
Error Page
If something is wrong with your website for any reason, website should show the specific error page which is related to that error and it should be user friendly. Don’t show programming error on the website.
OptimizeBefore launching your website, optimize website like images should not too heavy and minify the css and JavaScript files to load faster. Always use cache for static content. It makes your site faster.
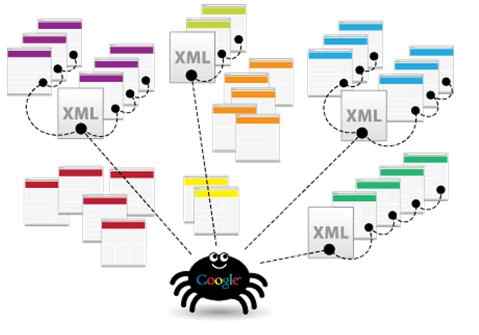
Sitemap
Sitemap is an important part of SEO. When any search engine goes to crawl your website, firstly they check your sitemap.xml file and get the relevant url from the sitemap.
You should make your website with sitemap.xml file and it must be uploaded in the root directory of the website. If you make any new url, note that it should be updated into the sitemap.
Make Social Presence You can also create social page for your website, because all of us engage with social sites on daily basis. It can be Facebook, Google+ or a Twitter page.