WindowsASPNETHosting.in VS IndiaLinks – Which one is The Best ASP.NET Core 1.0 Hosting in India ?

WindowsASPNETHosting.in VS IndiaLinks – Which one is The Best ASP.NET Core 1.0 Hosting in India ?

CheapWindowsHostingReview.com |Best and cheap ASP.NET Core 1.0 hosting.  If you are searching for the best web hosting service online, read all our  updated Web Hosting Reviews & Comparison 2017 to ensure you make a well informed decision. On this page we have investigated and reviewed all the major web hosting companies so you can easily differentiate features, pricing, support, service uptime and customer feedback. Every review was taken around the last 6 months and each hosting provider is reviewed on regular basis. If you have any experience with these website hosts services please feel free to write your own review of their service to help other people to find the best web hosting service for their online business. Our web hosting comparisons and reviews include customer support, features, pricing, value for money, security and reliability. All the best and we hope we help you to find your perfect hosting partner.

To choose the best Windows hosting for your websites, we will compare two of this India Windows hosting providers in the industry. This WindowsASPNETHosting.in VS IndiaLinks comparison is about to make clear that who is a better option ASP.NET Core 1.0 Hpsting in India.

India Windows Hosting Review

ItemWindowsASPNETHosting.inIndiaLinks
Price ***** ***
Features ***** *****
Uptime ***** ****
Speed ***** ****
Technical Support  ***** ****

wI35

WindowsASPNETHosting.in is the India’s #1 Windows hosting provider that offers the most reliable world class Windows hosting solutions for customers. WindowsASPNETHosting.in provides high quality affordable India’s Windows hosting services for personal and companies of all sizes. You can host your website with an innovative, reliable, and a friendly India’s Windows hosting company who cares about your business.

indialink

Indialinks Founded in 1997 Based in Mumbai, India Industry Leader in Managed Hosting Solutions. They are providing now web hosting on Linux, Window, Window reseller hosting, Linux Reseller hosting, VPS Hosting. They also treat their costumer as family member and costumer’s trouble as their own trouble.

WindowsASPNETHosting.in VS IndiaLinks: Pricing & Features

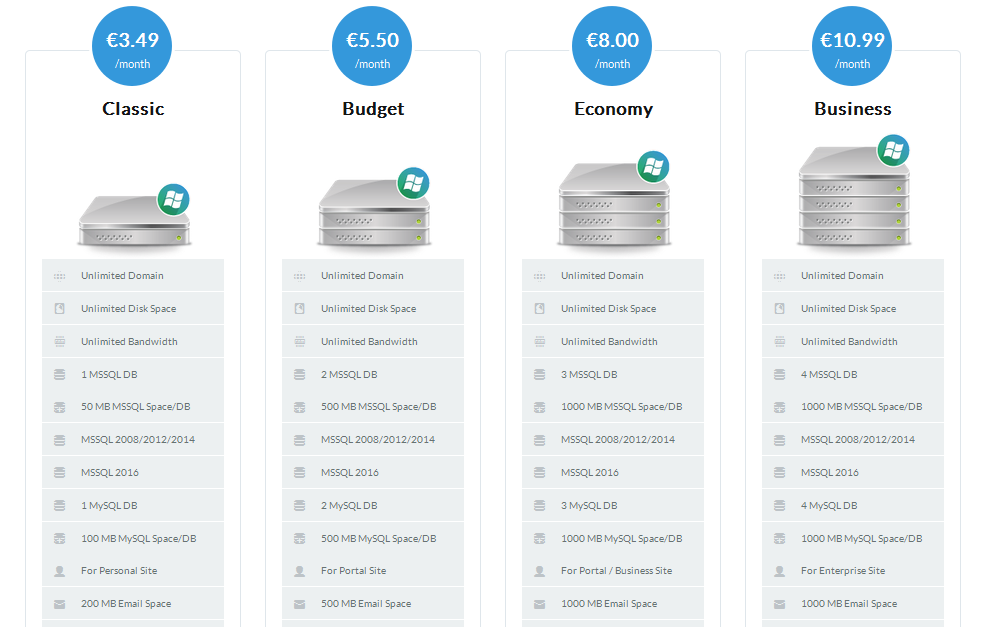
WindowsASPNETHosting.in releases four plans called Personal, Developer, Business and Expert at the prices of INR 159.99/month 35% OFF INR 299.99/month 35% OFF INR 679.99/month 35% OFF andINR 1099.99/month 35% OFF . Three billing cycles with different prices are available in WindowsASPNETHosting.in best India Windows hosting package. You can choose between 3-months, 1-year, 3-years and 5-years payment methods. WindowsASPNETHosting.in also supports 30-days money back guarantee. On the contrary, IndiaLinks offers several kinds of India Windows hosting plan starting from $149.99/mo in regular time. IndiaLinks only provide the costumers yearly payment method.

In below, we create a feature-comparison table of this two best India Windows hosting companies:

ItemWindowsASPNETHosting.inIndiaLinks
DomainUnlimited1
Bandwidth30 GB16 GB
Disk Space3 GB8 GB
Windows Server Version 2008/2012Version 2008
IIS VersionIIS 7/7.5/8.0/10IIS 7
ASP.NET VersionASP.NET v. 5/4.6/4.5.2/4.5.1ASP.NET v. 2.0 /3.0/4.0
ASP.NET MVC VersionASP.NET MVC v. 5.1.1/5.15.2/
5.1.2/6.0
ASP.NET MVC v. 2.0/3.0
MSSQL VersionMSSQL 2008/2012/2014MSSQL 2008/2012
Complete FeaturesMORE INFOMORE INFO

indialinkcmp

From the above comparison list, both of them are fully ASP.NET compatible. However, WindowsASPNETHosting.in and IndiaLinks are different from each other in many features. They both support the .NET technology, like Windows Server, IIS, isolated application pool, LINQ, AJAX, Silverlight, Full Trust, URL rewrite module. But WindowsASPNETHosting.in supports almost all version of Windows Server, ASP.NET, ASP.NET MVC, IIS and MSSQL database. WindowsASPNETHosting.in also supports ASP.NET Core 1.0 hosting with affordable price. What’s more WindowsASPNETHosting.in also provides unlimited domain while IndiaLinks still limit their domain. From the above table, we can conclude that WindowsASPNETHosting.in has more rich-featured India Windows hosting that what IndiaLinks has offered.

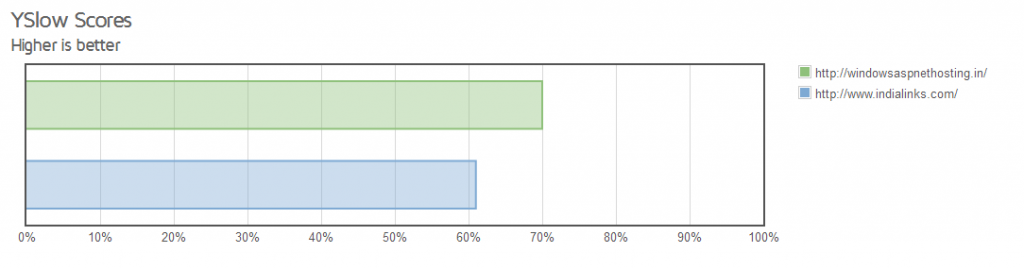
WindowsASPNETHosting.in VS IndiaLinks: Uptime & Speed

To ensure uptime and speed, both WindowsASPNETHosting.in and IndiaLinks have been investing much money and time. WindowsASPNETHosting.in leverages best-in-class connectivity and technology to innovate industry-leading, fully automated solutions that empower enterprises with complete access, control, security, and scalability. They own and operate three world-class data centers strategically located in Mumbai (India), London (UK) and Washington D.C.(US). WindowsASPNETHosting.in promise you in delivering 99.9% uptime. When it comes to IndiaLinks, they also located their data center in Chennai, Tamil Nadu and promise 99.9% uptime guarantee. However, most of IndiaLinks’s costumers are disappointed because of their slow speed website.

indialinkcmpr

WindowsASPNETHosting.in VS IndiaLinks: Technical Support

WindowsASPNETHosting.in offers 24/7 support through tickets, e-mail and contact form. When we contacted the their support representatives via e-mail, we got responses from WindowsASPNETHosting.in within an average of 5 minutes. In the other hand, IndiaLinks only provide phone call for their costumer. We’ve tried to call their support but they always show the busy tune. We do believe that WindowsASPNETHosting.in has more responsive support team.

Conclusion: WindowsASPNETHosting.in VS IndiaLinks?

From the combination of high performance, responsive support, rich-featured hosting and reasonable pricing, we conclude that WindowsASPNETHosting.in is better in serving India Windows hosting. It is clear that WindowsASPNETHosting.in is a more favorable choice due to its cost-effective features and considerate customer service.

Deploy ASP.NET Core to IIS & How ASP.NET Core Hosting Works

Deploy ASP.NET Core to IIS & How ASP.NET Core Hosting Works

CheapASPNETHostingReview.com | Best and cheap ASP.NET Core 1.0 hosting. In this article, we will review how to deploy an ASP.NET Core application to IIS. Deploying an ASP.NET Core app to IIS isn’t complicated, but ASP.NET Core hosting is a little different than ASP.NET.

How to Configure Your ASP.NET Core App For IIS

The first thing you will notice when creating a new ASP.NET Core project is they are actually console applications. Your project now contains a Program.cs file just like a console app would have and it contains the following code:

What is the WebHostBuilder?

All ASP.NET Core applications require a WebHost object that essentially serves as the application and web server. WebHostBuilder is used to configure and create the WebHost. You will normally see UseKestrel() and UseIISIntegration() in the WebHostBuilder setup code.

What do these do?

  • UseKestrel() – This registers the IServer interface for Kestrel as the server that will be used to host your application. In the future, there could be other options, including WebListener which will be Windows only.
  • UseIISIntegration() – This tells ASP.NET that IIS will be working as a reverse proxy in front of Kestrel. This then specifies some settings around which port Kestrel should listen on, forwarding headers, and other details.

If you are planning to deploy your application to IIS, UseIISIntegration() is required

What is AspNetCoreModule?

You may have noticed that ASP.NET Core projects create a web.config file. This is only used when deploying your application to IIS. It registers the AspNetCoreModule as an HTTP handler.

Default web.config for ASP.NET Core:

If you are planning to deploy your application to IIS, UseIISIntegration() is required

Default web.config for ASP.NET Core:

AspNetCoreModule handles all incoming traffic to IIS and acts as the reverse proxy that knows how to hand the traffic off to your ASP.NET Core application. You can view the source code of it on GitHub. It also ensures that your web application is running. It is responsible for starting your process up.

Install .NET Core Windows Server Hosting Bundle

Before you deploy your application, you need to install the .NET Core hosting bundle for IIS. This will install the .NET Core runtime, libraries, and the ASP.NET Core module for IIS.

After installing it, you may need to do a “net stop was /y” and “net start w3svc” to ensure all the changes are picked up for IIS.

Steps to Deploy ASP.NET Core to IIS

Before you deploy, you need to make sure that WebHostBuilder is configured properly to use Kestrel and IIS. Your web.config should also exist and look similar to our example above.

Step 1: Publish to a File Folder

how-to-deploy-asp-net-core-to-iis-10614

Step 2: Copy Files to Preferred IIS Location

Now you need to copy your publish output to where you want the files to live. If you are deploying to a remote server, you may want to zip up the files and move to the server. If you are deploying to a local dev box, you can copy them locally.

For my example, I am copying the files to C:\inetpub\wwwroot\AspNetCore46

You will notice that with ASP.NET core there is no bin folder and it potentially copies over a ton of different .NET dlls. Your application may also be an EXE file if you are targeting the full .NET Framework. My little sample project had over 100 dlls in the output.

img_58ee6a96d49de-1024x631

Step 3: Create Application in IIS

First, create a new IIS Application Pool. You will want to create one under the .NET CLR version of “No Managed Code“. Since IIS only works as a reverse proxy, it isn’t actually executing any .NET code.

Second, create your new application under your existing IIS Site, or create a new IIS site. Either way, you will want to pick your new IIS Application Pool and point it at the folder you copied your ASP.NET publish output files to.

img_58ee6b7a8b7e4

Step 4: Load Your App!

At this point, your application should load just fine. If it does not, check the output logging from it. Within your web.config file you define how IIS starts up your ASP.NET Core process. Enable output logging by setting stdoutLogEnabled=true and you may also want to change the log output location as configured in stdoutLogFile. Check out the example web.config before to see where they are set.

Advantages of Using IIS with ASP.NET Core Hosting

Microsoft recommends using IIS with any public facing site for ASP.NET core hosting. IIS provides additional levels of configurability, management, security, logging, and many other things. Check out my blog post about Kestrel vs IIS to see a whole matrix of feature differences. It goes more in depth about what Kestrel is and why you need both Kestrel & IIS.

One of the big advantages to using IIS is the process management. IIS will automatically start your app and potentially restart it if a crash were to occur. If you were running your ASP.NET Core app as a Windows Service or console app, you would not have that safety net there to start and monitor the process for you.

ASP.NET Core Identity Tables Customization With Visual Studio 2017

ASP.NET Core Identity Tables Customization With Visual Studio 2017

CheapASPNETHostingReview.com | Best and cheap ASP.NET Core 1.0 hosting. In this article, we will use Visual Studio 2017 and Entity Framework Core step by step to learn how we can:

  1. Change Identity table names.
  2. Change Identity table property names.
  3. Change Identity table datatype of primary key.

When you decide to use ASP.NET Core Identity it will generate some tables used to store data for users and other things.

Prior to it, let’s take a brief definition about ASP.NET Core Identity.

Released on 2016 and from the name we can say it’s all about identity of the users, you can manage login and Logout functionality, create an account also you can use external login providers such as Facebook, Google, Microsoft Account and Twitter. In other words, you can say, it gives you the ability to make an authentication and an authorization.

Let us see it in action

Open your Visual Studio 2017

image001

I am using an Enterprise edition but you can use any edition, which is available to you.

File > New > Project

Click ASP.NET Core Web Application and give it a name, as shown below.

image002

Select Web Application.

image003

Click Change authentication, select an individual user account and click OK, as shown below.

image004

Now, we have an Application but we need to make migration and we have several ways to achieve it. We will use Package Manager, as shown below

image005

Now, you need to create the database. Go to appsettings.json file and edit your connection string, if you want. I am using SQL Server 2016, so this is my appsettings.json file and it looks, as shown below.

Now, in Package Manager console, write Add-migration command, followed by the name of this migration command like this and wait for some seconds.

image006

Now, update the database and click enter.

image007

Now, go to the database and refresh it. You will find aspnet-IdentityConfig database with some tables created by default like AspNetUsers table.

We will use this table to achieve our goal.

image008

Now, how can we change this table name from AspNetUsers to AspUsers as example.

It’s database stuff, so we can achieve this from ApplicationDbContext class.

image009

To be specific from OnModelCreating method into this class, we can customize our ASP.NET Identity model and override the defaults like change table name, property name and others.

We will change the table name now from AspNetUsers to AspUsers by this code inside OnModelCreating method. Proceed, as shown below.

Note- After any customization in the tables, you should make database migration and update it to reflect the changes.

First, write add-migration. Subsequent to the migration, update the database.

image010

Now, refresh the database and you will find the name changed to AspUsers.

image011

Change Identity table property name

We need to change as an example Email to EmailAddress in AspUser table

image012

It’s very similar to what we did before, just we will add the code to the OnModelCreating

In this code we told entity to get Email property and change this column name to EmailAddress

Now you should make a migration to reflect your changes on Database and we will use it as usual

Add-Migration command then Update-Database

image013

Now it’s time to look in the database

image014

Change Identity table datatype of primary key

We will need to make some changes in ApplicationUser class so go to this class and open it

image015

ApplicationUser class contains all the custom information I want to store about a user, also inheritance here from IdentityUser gives me all essentials like username ,id, password property or Email, that means if I want to add any property, I will add it here in ApplicationUser class

By default the primary key is string

image016

Because IdentityUser has the primary key  we want to pass our new primary key datatype.

Where will we pass this new datatype? Look to the picture below

image017

As you can see we need to pass our primary key as example int datatype to IdentityUser<int> .

The code will look like this

And because every user has roles we will need to make this change in roles also by creating new class ApplicationRole which will inherit from IdentityRole class and pass the new datatype to it, and the code will look, as shown below.

Afterwards, we will make some change in our ApplicationDbContext class in order to open it.

image018

We need to add our new role and datatype IdentityDbContext to the class. It will look, as shown below.

In the last step, we will need to reconfigure ConfigureServices method in the startup class.

We need to make some changes in these lines.

We need to replace IdentityRole class to our role ApplicationRole class and add our new datatype to AddEntityFrameworkStores<ApplicationDbContext,int>

The code will look, as shown below.

Now, we have all the required changes achieved but the last step will be the migration.

This time, we have some new things like when you run add-migration command; you will see the warning, as shown below.

image019

When you try to run update-database, you will get an error told to you.

To change the IDENTITY property of a column, the column needs to be dropped and recreated.

Thus, we will drop the database and create it again.

Step 1

Drop the database command to remove the database and press Y.

Step 2

Remove all the migrations, which you have in Visual Studio.

Step 3

Run add-migration command.

Step 4

Run update-database command.

Now, go to the database to see our changes.

image020

You see now that id has int datatype and not nvarchar.

Summary

Now, you can change an Identity column name, Identity table name, Identity primary key. I hope this is helpful to you.

TOP LIST Best ASP.NET Core 1.0 Hosting with Special Discount in 2017

TOP LIST Best ASP.NET Core 1.0 Hosting with Special Discount in 2017

CheapASPNETHostingReview.com | Best and cheap ASP.NET Core 1.0 hosting. we had come out a list of the best ASP.NET hosting, which are rated independently based on the ASP.NET frameworks, Microsoft control libraries, databases, Microsoft technical support, and web hosting price.

Web-hosting

To choose the best ASP.NET hosting for your ASP.NET websites, we recommend you going with the best ASP.NET hosting as following. You won’t go wrong with them that all of the best ASP.NET hosting services have been truly tested by our ASP.NET developers.

Basic
Rank1234
Rating5.0 of 55.0 of 54.0 of 54.0 of 5
Customer301 votes186 votes75 votes100 votes
Regular $4.49/mo

15% OFF

 €3.49/Mo

15% OFF

$3.99/mo

35% OFF

£2.99/mo

35% OFF

Discount$3.81/mo€2.97/Mo$2.59/mo£1.95/mo
Basic
OS2016 R22014 R22012 R22012 R2
Control PanelPleskPleskPleskPlesk
Free DomainNoNoNoNo
BackupWeeklyDailyWeeklyWeekly
SSDyesyesyes
DomainUnlimited50
Hosting SitesUnlimitedUnlimited
Bandwidth60 GBUnlimited50 GB50 GB
Disk Space5 GBUnlimited10 GB5 GB
Shared SSLYesYesYesYes
Programming
ClassicASPYesYesYesYes
.NET Frameworks2.0/3.5SP1/4.5/5/core2.0/3.5SP1/4.0/4.5/5/core2.0/3.5SP1/4.5/5/core2.0/3.5SP1/4.5/5/core
ASP.NET MVC2/3/4/5/61/2/3/4/5/62/3/4/5/62/3/4/5/6
Silverlight4/54/54/54/5
SQL Server2016201620162016
MySQL3222
Remote IISYesYesNoYes
Trust LevelFullFullFullFull
Dedicated App PoolYesYesYesYes
WebMatrixYesYesYesYes
URLRewriteYesYesYesYes
GZip
Schedule JobsYesYesYesYes
Support
Service LevelProfessionalProfessionalProfessionalProfessional
24×7 SupportYesYesYesYes
Full trustYesYesYesYes
EmailYesYesYesYes

The Best ASP.NET Core 1.0 Hosting in 2017

ASPHostPortal is a web hosting provider known for its professional ASP.NET hosting plans which are able to meet the demands of nearly all-sized businesses. Over the past 10 years since its reception, ASPHostportal has gained respect from both the developer and business communities.

The ASPHostportal ASP.NET hosting packages all comes with ASP.NET v2/v3.5/v4.6, ASP.NET core 1.0 and supports most versions of the frameworks including MVC, LINQ, AJAX and Silverlight. Also, they allow Full Trust to make sure that ASP.NET websites can run perfectly without the bother of the codes that cannot run. Right now, using this exclusive coupon link for checking out, the Basic hosting plan is $3.81/mo only, 15% off $4.49/mo you get originally.

The customers’ hosting experience is guaranteed by ASPHostportal excellent technical support team which is very helpful, knowledgeable and responsive to phone calls, emails and live chat. In addition, they offer every account with 30 days full money back and anytime post-rate money back guarantee. That makes customers’ ASP.NET hosting risk-free.

ASPHostPortal Statistik Review

sts

To learn more about ASPHostPortal, visit http://asphostportal.com

Why They’re the Best ASP.NET Core 1.0 Hosting

The following 5 checkpoints are main criterias on rating ASP.NET web hosting besides the consideration on the generic Windows web hosting features.

  1. Windows OS: the latest version of Windows OS is the key point of a quality ASP.NET hosting solution. And now, the best choices are Windows Server 2012R2, Windows Server 2012 and Windows Server 2008R2. In fact, all the recommended hosting companies support the mentioned Windows operating systems.
  2. ASP.NET Frameworks: as ASP.NET websites have to run in the corresponding .NET framework, it’s better that the web host can support most of frameworks from v1.1 to v4.0. In this case that you can have maximum flexibility for you websites and keep the possibility upgrading to the higher version.
  3. ASP.NET Trust Level: it’s configured for each website by .net infrastructure. you should know the exact configuration before the payment. in our research, 70% websites can be run only under the fully trust level. if your hosting company doesn’t tell that they support fully trust, you should be careful that your website may not run correctly in the host finally. surely, you can ask for money back but it’s time wasting.
  4. RAM: this is the maximum memory in the server that can be used for your site, which is configured in IIS application pool. Only sufficient RAM allocation can bring the website a reliable hosting condition.
  5. MSSQL Edition: MSSQL makes a big difference to store all data from the website, which is a Windows based database. Note that, the latest version of MSSQL is the SQL Server 2012.
  6. Control Panel: Plesk is the best reliable control panel for asp.net web hostingl and easy-to-use.
  7. Add-on Features: the installation required third party libraries are important when your website depends on then. E.G. Chat controls library, Altas library and more.
  8. knowledge of Microsoft technology support: you can easily call the technical support of the web host and ask some technical questions about ASP.NET website configuration and deployment. This is certainly important especially when you have a problem in the future.
Tips for Building an API in ASP.NET Core

Tips for Building an API in ASP.NET Core

CheapASPNETHostingReview.com | Best and cheap ASP.NET Core 1.0 hosting. These days users expect a fluid, app-like experience on the internet. Thus, the new web is being built with APIs and single-page frontends. This means it’s more important that ever to build APIs that are easy to use, reliable, and scalable. ASP.NET Core makes it easy to build great APIs, but there are a few tips we’ve picked up that can help make your APIs even stronger and more scalable.

1. Set the Default Route for ASP.NET Core MVC

A lot of programmers who start using ASP.NET Core just use the default app.UseMvc(); line in the Configure method of Startup.cs. There are options that you can pass to the UseMvc function, like setting the default routes, which is one of the most overlooked:

This will set the root route of your API to: http://www.mycompany.com/api to call the DefaultController’s Get method.

What this does for you (aside from the obvious) is it sets the tone for a decent RESTful API. It also makes changes to URL strategy easier, including versioning the API in the URL easy to do if you set the URL strategy in one place.

2. Return IActionResult from .NET Core Controller Methods

Returning IActionResult from your controller methods affords the ability to take advantage of some of the helper methods and classes to ease returning proper HTTP results. The Ok method on the ControllerBase class will return an OkObjectResult that implements IActionResult and returns a 200 OK HTTP message to the caller. The NotFound method returns an object that sends a 404 NOT FOUND HTTP message.

There are quite a few others, but another extremely helpful one is the CreatedAtAction class that returns not only a 201 CREATED HTTP result but adds a header Location with the URL to access the newly created resource.

3. Use the .NET Async Pattern

Network calls by their very nature are asynchronous. It makes the most sense to create async controller methods that extend that asynchronicity when the controllers need to make database and external API calls.

The fact is, asynchronous support in .NET Core and the supporting libraries is very good these days. Using and creating asynchronous code is easy using async/await and libraries that support the Task pattern. The benefit is more simultaneous requests handled with the same hardware requirements.

Asynchronous code just performs better, and since it is so easy to create, why not do it?

4. Use .NET Attributes

Using attributes to decorate routes helps you to take advantage of some of the power of MVC. This may seem counterintuitive since I just told you to use the default routes. Decorating your methods and controller classes with just enough decoration for that class or method can help you take advantage of things like the CreatedAtAction.

You can also use attributes to help the JSON serializer do its job. You can use the NullValueHandling attribute to tell the serializer that when the value of a property is null, not to even serialize the property. You can change the property name that gets serialized so that you can stick with an internal coding standard and still return standard JSON names (like changing ‘MaxTitleLength’ to ‘maxLength’ when serialized). You can even set the order that properties are serialized so that more important properties are serialized first in the JSON documents.

5. Use Async Result Filters

Using Async Result Filters, you can shape the data in the last moments before it goes back to the caller. Usually, you’d add the properties you want (the way you want them) via an anonymous object. There are two problems with that approach, the first is that you need to do a lot of copying of properties and it violates the single responsibility principle. You could use AutoMapper to combat this property copying, but it doesn’t solve the second problem, which is adding new properties (like hypermedia).

Solution: An Async Result Filter will solve both problems and give you a cleaner, more maintainable code base.

BONUS: Try This Workaround to Improve Serialization of Self-Referencing Object Graphs

One of the problems with traditional .NET Web API serialization, is that it doesn’t handle self-referencing object graphs very well. The fact is, in good object-oriented objects there may actually be some reference loops, so it’s important to handle them gracefully.

In your ConfigureServices method of Startup.cs, change your MVC line from:

to :

In .NET 4.x a reference loop would cause an error. Once the serializer realized that serializing the object graph would cause a reference loop, it would fail and just send a 500 error. However, in .NET Core without the above JSON options added, the serializer serializes the object until it hits a reference loop and simply sends what has been serialized so far, ignoring the rest of the object, even if it could serialize the rest of the object graph easily.

What this line adds is, it tells the JSON serializer to ignore reference loops and continue serializing the rest of the graph. So far, this is just a workaround for the issue. It’s not perfect, but it’s better than just a failure.

The best way to handle this problem is to simply not have the problem. Normally, we would put these objects into DTOs that are not self-referencing and remove the problem altogether.

How To Authentication in ASP.​NET Core for your Web API and Angular2

How To Authentication in ASP.​NET Core for your Web API and Angular2

CheapASPNETHostingReview.com | Best and cheap ASP.NET Core 1.0 hosting. In this post we will talking about Authentication in ASP.NET for web API and Angular. Authentication in a single page application is a bit more special, if you just know the traditional ASP.NET way. To imagine that the app is a completely independent app like a mobile app helps. Token based authentication is the best solution for this kind of apps. In this post I’m going to try to describe a high level overview and to show a simple solution.

There are many ways to protect your application out there. The simplest one is using an Azure Active Directory. You could also setup a separate authentication server, using IdentityServer4, to manage the users, roles and to provide a token based authentication.

And that’s the key word: A Token Based Authentication is the solution for that case.

With the token bases authentication, the client (the web client, the mobile app, and so on) gets a string based encrypted token after a successful log-in. The token also contains some user info and an info about how long the token will be valid. This token needs to be stored on the client side and needs to be submitted to the server every time you request a resource. Usually you use a HTTP header to submit that token. If the token is not longer valid you need to perform a new log-in.

In one of our smaller projects, didn’t set-up a different authentication server and we didn’t use Azure AD, because we needed a fast and cheap solution. Cheap from the customers perspective.

The Angular2 part

On the client side we used angular2-jwt, which is a Angular2 module that handles authentication tokens. It checks the validity, reads meta information out of it and so on. It also provides a wrapper around the Angular2 HTTP service. With this wrapper you are able to automatically pass that token via a HTTP header back to the server on every single request.

The work flow is like this.

  1. If the token is not valid or doesn’t exist on the client, the user gets redirected to the log-in route
  2. The user enters his credentials and presses the log-in button
  3. The date gets posted to the server where a special middle-ware handles that request
    1. The user gets authenticated on the server side
    2. The token, including a validation date and some meta date, gets created
    3. The token gets returned back to the client
  4. the client stores the token in the local storage, cookie or whatever, to use it on every new request.

The angular2-jwt does the most magic on the client for us. We just need to use it, to check the availability and the validity, every time we want to do a request to the server or every time we change the view.

This is a small example about how the HTTP wrapper is used in Angular2:

The ASP.NET part

On the server side we also use a, separate open source project, called SimpleTokenProvider. This is really a pretty simple solution to authenticate the users, using his credentials and to create and provide the token. I would not recommend to use this way in a huge and critical solution, in that case you should choose the IdentiyServer or any other authentication like Azure AD to be more secure. The sources of that project need to be copied into your project and you possibly need to change some lines e. g. to authenticate the users against your database, or whatever you use to store the user data. This project provides a middle-ware, which is listening on a defined path, like /api/tokenauth/. This URL is called with a POST request by the log-in view of the client application.

The authentication for the web API, is just using the token, sent with the current request. This is simply done with the built-in IdentiyMiddleware. That means, if ASP.NET MVC gets a request to a Controller or an Action with an AuthorizeAttribute, it checks the request for incoming Tokens. If the Token is valid, the user is authenticated. If the user is also in the right role, he gets authorized.

We put the users role information as additional claims into the Token, so this information can be extracted out of that token and can be used in the application.

To find the users and to identify the user, we use the given UserManager and SignInManager. These managers are bound to the IdentityDataContext. This classes are already available, when you create a new project with Identiy in Visual Studio.

This way we can authenticate a user on the server side:

And this claims will be used to create the Jwt-Token in the TokenAuthentication middle-ware:

This code will not work, if you copy and past it in your application, but shows you what needs to be done to create a token and how the token is created and sent to the client.

Billig Core ASP.NET 1.0 Hosting in Europa mit 15% Rabatt

Billig Core ASP.NET 1.0 Hosting in Europa mit 15% Rabatt

CheapASPNETHostingReview.com | Beste und billig Core ASP.NET 1.0 Hosting in Europa. Sind Sie auf der Suche nach den besten Kern von ASP.NET 1.0 Hosting oder das Beste Windows Hosting? Ihre beste ASP.NET Core 1.0 Web Hosting Suche ist vorbei! Sparen Sie Zeit und Geld für die besten Windows Hosting Für finden Sie in unserer Top Core ASP.NET 1.0 Hosting Unternehmen mit großen Förderung empfohlene Liste!

Big Deal 15% RABATT billig Core ASP.NET 1.0 Hosting in Europa

HostForLIFE.eu

hflbigsleHostForLIFE wurde als eine der besten asp.net ERKANNT Für Menschen, die mit den Leistungen unzufrieden sind, HostForLIFE bietet eine 30 Tage Geld-zurück-Garantie, so dass die Kunden ihre Konten innerhalb der ersten 30 Tagen zu stornieren und erhalten eine volle Rückerstattung. Wenn es um die Zahlung, zwei Zahlungsmethoden sind verfügbar, einschließlich CC und PayPal, um sicherzustellen, dass jeder Kunde die Dienste auf eine bequeme Weise erreicht.

Empfehlung: Wir empfehlen Ihnen dringend, Ihre asp.net Website oder Anwendung auf Hostforlife.eu Web Hosting zu bewirten. Diese Webseite ist auch gehostet mit HostForLIFE und wir sind sicher, müssen Sie die Geschwindigkeit bemerkt haben. Sie können auch die Vorteile der speziellen Hostforlife’s Angebot und können günstige Asp.net (Windows) Hosting mit unbegrenzte Bandbreite kaufen.

Günstigen Preis für eine Lösung mit hoher Verfügbarkeit
Auf Enterprise-Hardware
24/7/365 Kunden Betreuung und Unterstützung
99,9&Uptime Garantie
Spezielle App Pool
Amsterdam (NL) , London (United Kingdom), Paris (France), Frankfurt (DE) and Seattle (USA) Data Center

Warum diese Hosts bieten ASP.NET Hosting für unbegrenzte

Gut, das ist eine berechtigte Frage. Viele Leute fragen, warum Web Hosting Provider mit unbegrenzten ASP.NET Hosting. Alle Hosts, die billig und Unlimited Web Hosting, um Ihnen zu helfen, Ihre Anwendung auf IT-Test anbieten und wenn Sie zufrieden sind können Sie Ihr Paket auf eine höhere Ebene aktualisieren können. Einige andere will Studenten zu helfen, damit sie ihre Anwendungen entwickeln und testen.

Unlimitations und Einschränkungen der billigen ASP.NET

die meisten Hosting Pakete hosting Pläne kommen mit sehr wenig Speicherplatz und eine begrenzte Bandbreite. Wenn Sie planen, für sie ihr Geschäft Web site oder ein hoher Verkehr Website diese Pläne sind nicht geeignet, weil sie unbegrenzte Anzahl an Domains, Speicherplatz erhalten können auch die Bandbreite.

hflnhfln1

Top 10 Gründe, mit unseren Top ASP.NET Core 1.0 Hosting Provider Empfehlung auf Host:

  • .NET Hosting Services von cheapaspnethostingreview.com
  • Microsoft-recognized .net Hosting Unternehmen
  • preisgekrönte .NET HOSTING Lösungen
  • Neueste getestet. NET Hosting Technologien
  • Beste .NET Hosting Preise
  • starken Kunden Testimonials
  • 24×7 Telefon- & E-Mail-Support
  • 99,9% Uptime Garantie
  • Geld-zurück-Garantie

ASP.NET Hosting Anforderungen

Windows Hosting Unternehmen die aktuellste unterstützen sollte. NET-Technologien und die aktuellsten Versionen. Stellen Sie sicher, dass, wenn Sie ASP.NET 4.6 hosting Core/benötigen, IIS 8, MVC 6, MS SQL 2016 Ihr Gastgeber unterstützen Sie. Auch wenn Sie nicht die neuesten Versionen fragen Sie sich, wenn Sie sie in der nahen Zukunft verwenden werden? Auch die Art und Weise Sie ihrer Datenbank Server aufbauen konnte und Website Bereitstellung prüfen. Die meisten der besten ASP.NET Hosts unterstützen die neuesten und innovativen .NET hosting Technologien.

Nutzen Sie die leistungsstarken, on-demand .NET Hosting die Leistung Ihrer IT-Infrastruktur zu steigern. Mehrere Web hosting Pläne zur Verfügung stehen, so dass Sie die nötige Flexibilität, um die Services je nach Ihren Bedürfnissen anpassen. Verlassen Sie sich auf Windows Web Hosting schnell zu skalieren und die Bereitstellung von IT-Ressourcen, wenn Sie sie benötigen, und zahlen für die Ressourcen, die Sie nutzen. Die .NET Web Hosting erhalten Kunden eine zuverlässige Leistung und Kundendienst zu einem erschwinglichen Preis.

How To Using Sessions and HttpContext in ASP.NET Core and MVC Core

How To Using Sessions and HttpContext in ASP.NET Core and MVC Core

CheapASPNETHostingReview.com | Best and cheap ASP.NET core 1.0 hosting. If you’re new to ASP.NET Core or MVC Core, you’ll find that sessions don’t work the way they used to. Here’s how to get up and running the new way.

Add Session NuGet Package

Add the Microsoft.AspNetCore.Session NuGet package to your project.

VERSION WARNING: As you’ll find with most Microsoft.* packages, you should make sure the versions all match. At RTM time as of writing, this means “1.0.0”.

Update startup.cs

Now that we have the Session nuget package installed, we can add sessions to the ASP.NET Core pipeline.

Open up startup.cs and add the AddSession() and AddDistributedMemoryCache() lines to the ConfigureServices(IServiceCollection services)

Next, we’ll tell ASP.NET Core to use a Memory Cache to store the session data. Add the UseSession() call below to the Configure(IApplicationBulider app, ...)

Where’s the Session variable gone?

Relax it’s still there, just not where you think it is. You can now find the session object by using HttpContext.Session. HttpContext is just the current HttpContext exposed to you by the Controller class.

If you’re not in a controller, you can still access the HttpContext by injecting IHttpContextAccessor.

Let’s go ahead and add sessions to our Home Controller:

You’ll see the Index() and About() methods making use of the Session object. It’s pretty easy here, just use one of the Set() methods to store your data and one of the Get() methods to retrieve it.

Just for fun, let’s inject the context into a random class:

Let’s break this down.

Firstly I’m setting up a private variable to hold the HttpContextAccessor. This is the way you get the HttpContext now.

Next I’m adding a convenience variable as a shortcut directly to the session. Notice the =>? That means we’re using an expression body, aka a shortcut to writing a one liner method that returns something.

Moving to the contructor you can see that I’m injecting the IHttpContextAccessor and assigning it to my private variable. If you’re not sure about this whole dependency injection thing, don’t worry, it’s not hard to get the hang of (especially constructor injection like I’m using here) and it will improve your code by forcing you to write it in a modular way.

But wait a minute, how do I store a complex object?

How do I store a complex object?

I’ve got you covered here too. Here’s a quick JSON storage extension to let you store complex objects nice and simple

Now you can store your complex objects like so:

and retrieve them just as easily:

Use a Redis or SQL Server Cache instead

Instead of using services.AddDistributedMemoryCache() which implements the default in-memory cache, you can use either of the following.

SQL Server
Firstly, install this nuget package:

  • "Microsoft.Extensions.Caching.SqlServer": "1.0.0"

Secondly, add the appropriate code snippet below:

Redis Cache
Unfortunately, the redis package does not support netcoreapp1.0 at the moment. You can still use this if you’re using net451 or higher.

"Microsoft.Extensions.Caching.Redis": "1.0.0"

Stay up to date

Even though we’ve reached RTM, you should still keep an eye on the ASP.NET Session Repository for any changes.

About Bundling and Minification in ASP.NET Core

About Bundling and Minification in ASP.NET Core

CheapASPNETHostingReview.com | Best and cheap ASP.NET Core 1.0 hosting. This post is about Bundling and Minification in ASP.NET Core. Bundling and minification are two techniques you can use in ASP.NET to improve page load performance for your web application. Bundling combines multiple files into a single file. Minification performs a variety of different code optimizations to scripts and CSS, which results in smaller payloads. In ASP.NET Core RTM release Microsoft introduced “BundlerMinifier.Core” tool which will help you to bundle and minimize Javascript and style sheet files. Unlike previous versions MVC, the bundling and minification is happening on development time not in runtime. To use “BundlerMinifier.Core” first you need to add reference of BundlerMinifier.Core in the project.json tools section.

Now you need to specify the Javascript and stylesheet files for bundling and minification. You can do this by adding “bundleconfig.json” file. The name can be changed, but if the filename is bundleconfig.json, it will bundle command will take it automatically. Here is a minimal bundleconfig.json file.

The file is self explantory, you can specify multiple file in the inputFiles element, which will be combined and minified based on the minify element. Now you can combine and minify using “dotnet bundle” command. Here is the output when I run the dotnet bundle command on my MVC project.

bundle_minification_running

You can integrate it to the development lifecycle by adding the dotnet build command in the “precompile” script section in project.json file. If you are using Yo ASP.NET generator, the project template will be using precompile script section in project.json.

There are few more commands also available with dotnet bundle tool.

  • dotnet bundle clean – Executing dotnet bundle clean will delete all output files from disk.
  • dotnet bundle watch – To automatically run the bundler when input files change, call dotnet bundle watch. This will monitor any file changes to input files in the working directory and execute the bundler automatically.
  • dotnet bundle help – Get help on how to use the CLI.

Happy Programming 🙂

Claim NOW Big Promotion From ASPHostPortal.com

How To Handling Error in ASP.NET Core

How To Handling Error in ASP.NET Core

CheapASPNETHostingReview.com | Best and cheap ASP.NET Core 1.0 hosting. When errors occur in your ASP.NET Core app, you can handle them in a variety of ways, as described in this article.

The developer exception page

To configure an app to display a page that shows detailed information about exceptions, install the Microsoft.AspNetCore.Diagnostics NuGet package and add a line to the Configure method in the Startup class:

 Put UseDeveloperExceptionPage before any middleware you want to catch exceptions in, such as app.UseMvc.

Warning [wp-svg-icons icon=”warning” wrap=”i”]

Enable the developer exception page only when the app is running in the Development environment. You don’t want to share detailed exception information publicly when the app runs in production

To see the developer exception page, run the sample application with the environment set to Development, and add ?throw=true to the base URL of the app. The page includes several tabs with information about the exception and the request. The first tab includes a stack trace.

1developer-exception-page

The next tab shows the query string parameters, if any.

3developer-exception-page-query

This request didn’t have any cookies, but if it did, they would appear on the Cookies tab. You can see the headers that were passed in the last tab.

4developer-exception-page-headers

Configuring a custom exception handling page

It’s a good idea to configure an exception handler page to use when the app is not running in the Development environment.

 In an MVC app, don’t explicitly decorate the error handler action method with HTTP method attributes, such as HttpGet. Using explicit verbs could prevent some requests from reaching the method.

Configuring status code pages

By default, your app will not provide a rich status code page for HTTP status codes such as 500 (Internal Server Error) or 404 (Not Found). You can configure the StatusCodePagesMiddleware by adding a line to the Configure method :

By default, this middleware adds simple, text-only handlers for common status codes, such as 404:+

6default-404-status-code

The middleware supports several different extension methods. One takes a lambda expression, another takes a content type and format string.

 There are also redirect extension methods. One sends a 302 status code to the client, and one returns the original status code to the client but also executes the handler for the redirect URL.

 If you need to disable status code pages for certain requests, you can do so:

Exception-handling code

Code in exception handling pages can throw exceptions. It’s often a good idea for production error pages to consist of purely static content.

Also, be aware that once the headers for a response have been sent, you can’t change the response’s status code, nor can any exception pages or handlers run. The response must be completed or the connection aborted.

Server exception handling

In addition to the exception handling logic in your app, the server hosting your app will perform some exception handling. If the server catches an exception before the headers have been sent it sends a 500 Internal Server Error response with no body. If it catches an exception after the headers have been sent, it closes the connection. Requests that are not handled by your app will be handled by the server, and any exception that occurs will be handled by the server’s exception handling. Any custom error pages or exception handling middleware or filters you have configured for your app will not affect this behavior.

Startup exception handling

Only the hosting layer can handle exceptions that take place during app startup. Exceptions that occur during app startup can impact server behavior. For example, if an exception happens before you call KestrelServerOptions.UseHttps, the hosting layer catches the exception, starts the server, and displays an error page on the non-SSL port. If an exception happens after that line executes, the error page is served over HTTPS instead.

You can configure how the host will behave in response to errors during startup using CaptureStartupErrors and the detailedErrors key.

ASP.NET MVC error handling

MVC apps have some additional options for handling errors, such as configuring exception filters and performing model validation.

Exception Filters

Exception filters can be configured globally or on a per-controller or per-action basis in an MVC app. These filters handle any unhandled exception that occurs during the execution of a controller action or another filter, and are not called otherwise. Learn more about exception filters in

Tip [wp-svg-icons icon=”pushpin” wrap=”i”]

Exception filters are good for trapping exceptions that occur within MVC actions, but they’re not as flexible as error handling middleware. Prefer middleware for the general case, and use filters only where you need to do error handling differently based on which MVC action was chosen.

Handling Model State Errors

Model validation occurs prior to each controller action being invoked, and it is the action method’s responsibility to inspect ModelState.IsValid and react appropriately.

Some apps will choose to follow a standard convention for dealing with model validation errors, in which case a filter may be an appropriate place to implement such a policy. You should test how your actions behave with invalid model states.