CheapASPNETHostingReview.com | Best and cheap ASP.NET Core hosting. In order to include an Area in an ASP.NET Core app, first we need to include a conventional route in the Startup.cs file (It’s best to place it before any non-area route).
Then, make a folder named Areas in the app root and make another directory named Admin inside the former. Inside the admin folder, create the following folders (ViewComponent is optional).
Now, we will create a Controller inside the Controllers folder named AdminController.
Now, in order for that to work, you’ll need to create Views for all actions that return one. The hierarchy for Views is just like what you have in a non-area Views folder.
Question – What if I want to have another Controller inside my Area?
Answer
Just add another Controller beside AdminController and make sure the routes are like the following,
1
2
3
4
5
6
7
8
9
10
11
[Area("Admin")]
[Route("admin/[controller]")]
publicclassProductsController:Controller{
publicProductsController(){
//
}
[Route("{page:int?}")]
publicIActionResult Index(){
returnView();
}
}
The important part is [Route(“admin/[controller]”)]. With that, you can keep the style of routing to admin /controller/ action/.
CheapASPNETHostingReview.com | Best and cheap ASP.NET Core hosting. This short post about how to set the hosting environment in ASP.NET Core.
However, if this is a capability you think you will need, you can use a similar approach to the one I use in that post to set the environment using command line arguments.
This approach involves building a new IConfiguration object, and passing that in to the WebHostBuilder on application startup. This lets you load configuration from any source, just as you would in your normal startup method, and pass that configuration to the WebHostBuilder using UseConfiguration. The WebHostBuilder will look for a key named "Environment" in this configuration, and use that as the environment.
For example, if you use the following configuration.
1
2
3
4
5
6
7
8
9
10
11
varconfig=newConfigurationBuilder()
.AddCommandLine(args)
.Build();
varhost=newWebHostBuilder()
.UseConfiguration(config)
.UseContentRoot(Directory.GetCurrentDirectory())
.UseKestrel()
.UseIISIntegration()
.UseStartup<Startup>()
.Build();
You can pass any setting value with this setup, including the “environment variable”:
This is fine if you can use command line arguments like this, but what if you want to use environment variables? Again, the problem is that they’re shared between all apps on a machine.
However, you can use a similar approach, coupled with the UseEnvironment extension method, to set a different environment for each machine. This will override the ASPNETCORE_ENVIRONMENT value, if it exists, with the value you provide for this application alone. No other applications on the machine will be affected.
With this approach you can effectively have a per-app environment variable that you can use to configure the environment for an app individually.
Summary
On shared hosting, you may be in a situation when you want to use a different IHostingEnvironment for multiple apps on the same machine. You can achieve this with the approach outlined in this post, building an IConfiguration object and passing a key to WebHostBuilder.UseEnvironment extension method.
CheapASPNETHostingReview.com| Best and cheap ASP.NET Core Hosting.This post is about running Javascript code in the Server. Because a huge number of useful, high-quality Web-related open source packages are in the form of Node Package Manager (NPM) modules. NPM is the largest repository of open-source software packages in the world, and the Microsoft.AspNetCore.NodeServices package means that you can use any of them in your ASP.NET Core application.
To use Node Services, first you need to include the reference of Microsoft.AspNetCore.NodeServices package in your project file. You can do this using dotnet add package Microsoft.AspNetCore.NodeServices command.
Now you’re able to get instance of INodeServices in your application. INodeServices is the API through which .NET code can make calls into JavaScript that runs in a Node environment. You can use FromServices attribute to get the instance of `INodeServices’ in your action method. Here is Add method implementation in MVC.
ViewData["ResultFromNode"]=$"Result of {num1} + {num2} is {result}";
returnView();
}
And here is the code of AddModule.js file
1
2
3
4
module.exports=function(callback,num1,num2){
varresult=num1+num2;
callback(null,result);
};
You need to use the type of the result in your InvokeAsync method, in this example I am using int. NodeServices allows ASP.NET Core developers to make use of the entire NPM ecosystem, which gives rise to a huge range of possibilities. You can find the full source code on GitHub.
CheapASPNETHostingReview.com | Best and cheap ASP.NET Core 1.0 hosting. In this article, we will use Visual Studio 2017 and Entity Framework Core step by step to learn how we can:
Change Identity table names.
Change Identity table property names.
Change Identity table datatype of primary key.
When you decide to use ASP.NET Core Identity it will generate some tables used to store data for users and other things.
Prior to it, let’s take a brief definition about ASP.NET Core Identity.
Released on 2016 and from the name we can say it’s all about identity of the users, you can manage login and Logout functionality, create an account also you can use external login providers such as Facebook, Google, Microsoft Account and Twitter. In other words, you can say, it gives you the ability to make an authentication and an authorization.
Let us see it in action
Open your Visual Studio 2017
I am using an Enterprise edition but you can use any edition, which is available to you.
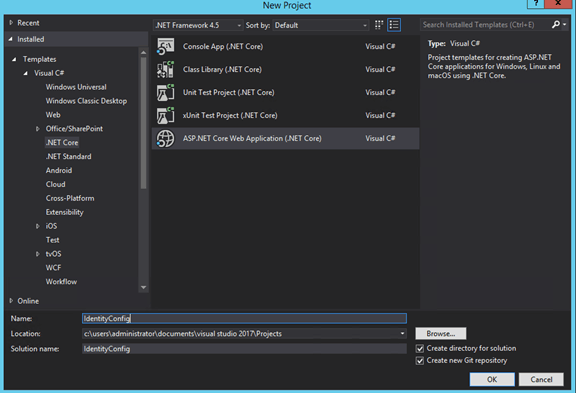
File > New > Project
Click ASP.NET Core Web Application and give it a name, as shown below.
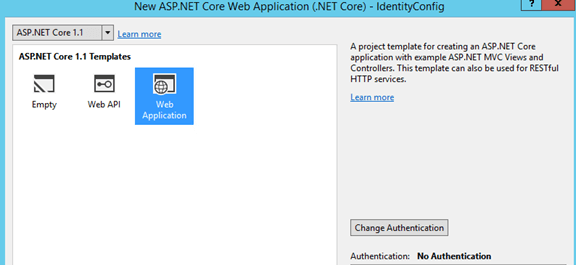
Select Web Application.
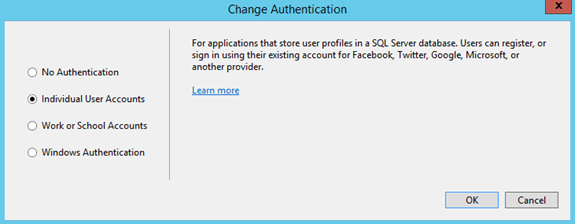
Click Change authentication, select an individual user account and click OK, as shown below.
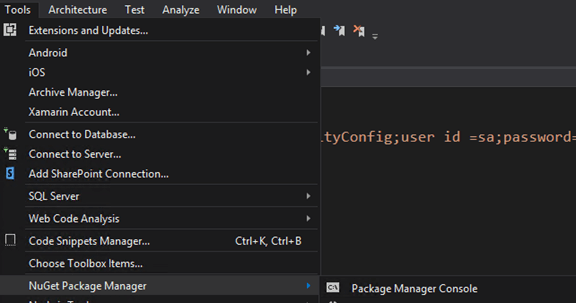
Now, we have an Application but we need to make migration and we have several ways to achieve it. We will use Package Manager, as shown below
Now, you need to create the database. Go to appsettings.json file and edit your connection string, if you want. I am using SQL Server 2016, so this is my appsettings.json file and it looks, as shown below.
1
2
3
4
5
6
7
8
9
10
11
{
"ConnectionStrings":{
"DefaultConnection":"Server=localhost;Database=aspnet-IdentityConfig;user id =sa;password=123456;MultipleActiveResultSets=true"
},
"Logging":{
"IncludeScopes":false,
"LogLevel":{
"Default":"Warning"
}
}
}
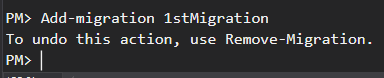
Now, in Package Manager console, write Add-migration command, followed by the name of this migration command like this and wait for some seconds.
Now, update the database and click enter.
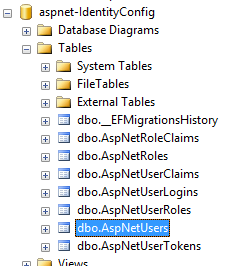
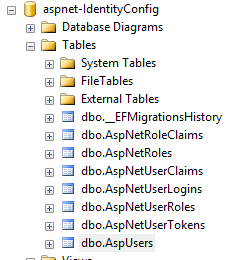
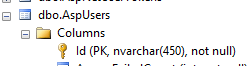
Now, go to the database and refresh it. You will find aspnet-IdentityConfig database with some tables created by default like AspNetUsers table.
We will use this table to achieve our goal.
Now, how can we change this table name from AspNetUsers to AspUsers as example.
It’s database stuff, so we can achieve this from ApplicationDbContext class.
To be specific from OnModelCreating method into this class, we can customize our ASP.NET Identity model and override the defaults like change table name, property name and others.
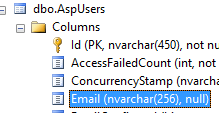
We will change the table name now from AspNetUsers to AspUsers by this code inside OnModelCreating method. Proceed, as shown below.
In this code we told entity to get Email property and change this column name to EmailAddress
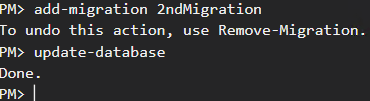
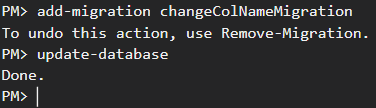
Now you should make a migration to reflect your changes on Database and we will use it as usual
Add-Migration command then Update-Database
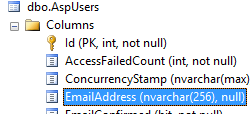
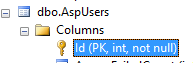
Now it’s time to look in the database
Change Identity table datatype of primary key
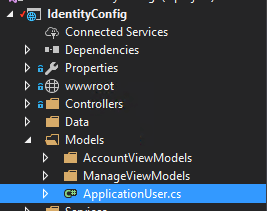
We will need to make some changes in ApplicationUser class so go to this class and open it
1
2
3
publicclassApplicationUser:IdentityUser
{
}
ApplicationUser class contains all the custom information I want to store about a user, also inheritance here from IdentityUser gives me all essentials like username ,id, password property or Email, that means if I want to add any property, I will add it here in ApplicationUser class
By default the primary key is string
Because IdentityUser has the primary key we want to pass our new primary key datatype.
Where will we pass this new datatype? Look to the picture below
As you can see we need to pass our primary key as example int datatype to IdentityUser<int> .
And because every user has roles we will need to make this change in roles also by creating new class ApplicationRole which will inherit from IdentityRole class and pass the new datatype to it, and the code will look, as shown below.