ASPHostPortal As The Best ASP.NET Hosting Provider

ASPHostPortal As The Best ASP.NET Hosting Provider

I had been looking for a suitable hosting provider for my website and, believe me, there are almost thousands of sites selling the same ASP for almost similar price and services. And of course, I never thought to find ‘the one’ from all of them without trying to read their ‘specification’ and sure their trusted offices. Finding a hosting provider does not seem as easy as it looks.

As the result, just for your information ASP.Net coming from an open – source server – side website application framework designed for web development to produce a dynamic web page. It is first released in 2002 and it allows programmer to build their own dynamic websites, web applications and web services. As a beginner front end developer, or just a newbie website programmer, I am trying to find the simplest and well known web hosting and trustable hosting provider to start with.

That is why I want to help you with my reviews about ASPHostportal ASP.NET core hosting and I hope it would be useful for anyone who just (like me) trying to find the best – fit web hosting and/or hosting provider which you can compare to another hosting provider. Also for their pros and cons based on my experience as a paying costumer.

As one of the most well – known web hosting, finding user reviews about the ASPHostPortal wouldn’t be such a difficulty. Some of them even (specifically) starting to explain with details almost on every side of the product itself. I am not going to go that far by the way (especially because it is just a review) and just sharing my perception about the web hosting by their services, speeds, performances, up time and soon.

  • Pricing and Plan Structure

Actually, compared to any other hosting provider with their own monthly payment prices, ASPHostPortal might give you the cheapest price for their ASP web hosting services. I have been looking and comparing for the four (or more) ASP.Net provider and it is just shocked me that they sell it starting from almost only one dollar in a month. The ranges of prices are reasonable and I am not saying that the other hosting provider puts a higher price for the same products. They have almost similar in prices starting from 1 dollar up to 2 or 3 dollars for a month (not include renewable prices).

What makes them different is coming from bonuses, discount and renewal prices, but I can assure you that it does affordable. You might choose the best hosting provider by meticulously breakdown their true value into different parts like looking at their core hosting features or else.

Core hosting features are something called with the “3 D’s” – domains, databases and disk space, like specification besides of your chosen web hosting. They usually put the core hosting features right down below the prices as one of the marketing strategies which ease you to pick your favorable web hosting. The name ‘core’ purposed for your hosting server to served website files when someone types your domain names. Here’s your “3 D’s” consideration:

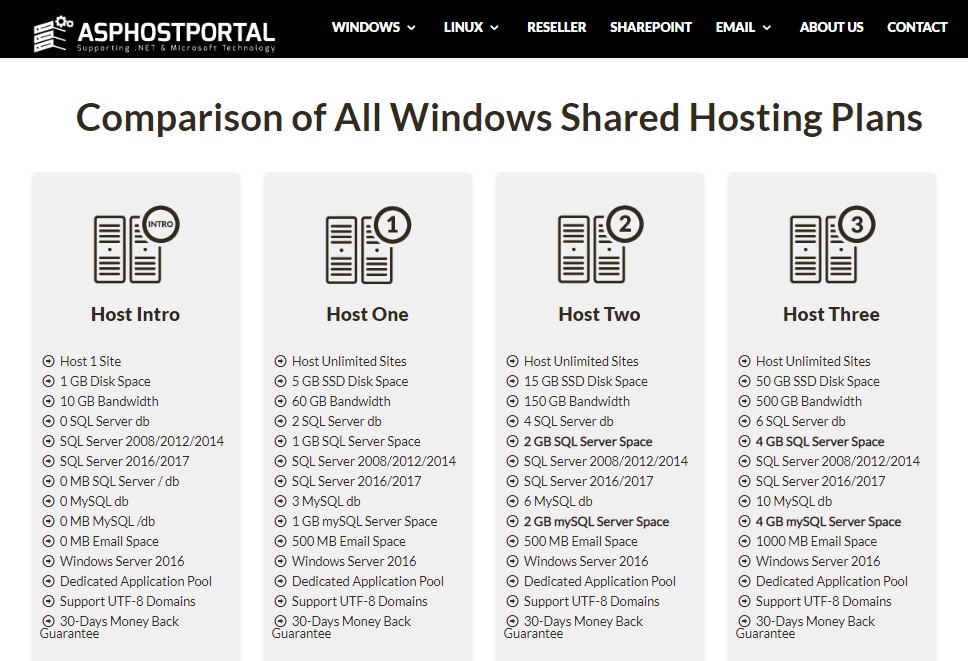
  1. Domains, about how many domain names you want from your hosting account with provided charge for each selection. If you need multiple websites you should also have multiple domain names.
  2. Databases are about how many, website software could be use and run on your hosting server.
  3. Disk space is just another how big data and files you could put on your server.

ASPHostPortal makes things much simpler by providing 2 of the most wanted ASP hosting server that is Windows and Linux (which I think it is most basically concentrated more in their Windows ASP). The difference is just about the number of hosting you might need and of course according to their features inside.

1 Giga bite disk space and 10 GB bandwidth for only a dollar in a month is something you should really try because I am not lying that ASPHostPortal is just not an ordinary hosting provider. It is trustable and they are professional workers for almost 11 years now.

  • Security, Reliability and Performance

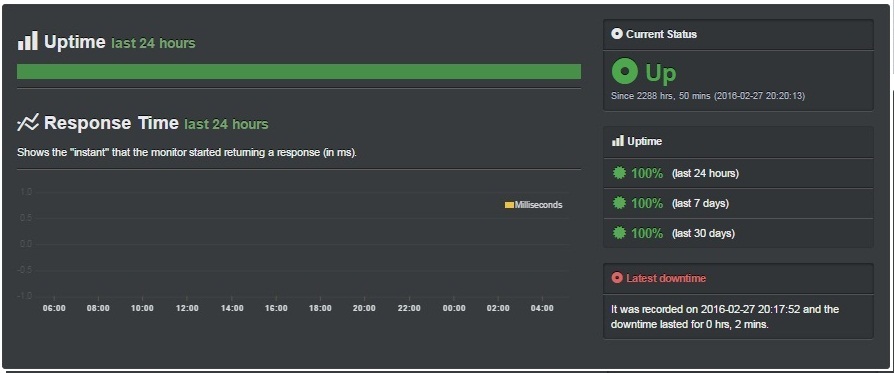
As said that ASPHostPortal is one of the most recommended windows hosting in the world, I think it is quite good for some reasons. What I mean is, how fast your website would run and another trouble about buffering or else in performance is something you should know before choosing your own web hosting. Well, I have been running the ASPHostPortal and finding that their moderate yet stable speed is about 99.99% uptime (it is guaranteed) and it is of course high quality which the world (mostly) uptime standard is about 99%.

Well, I am not trying to call their service support at 12 o’clock in the midnight just to verify whether they truly have 24/7 support management or not. Just once, in the morning and the response is quite fast and problem solving so I think it is similar enough with thousand other reviewers, ASPHostPortal does have professional support and its 30 days guaranteed or your money back.

ASPHostPortal also provided by ‘reseller’ panels for anyone who wants to sell their already ‘management’ website and it is helpful because some other hosting provider doesn’t and also, together with its ‘take line’ by providing the best web hosting for the cheapest price, you can also buy 10 resellers website with 40 GB disk space and 200 GB bandwidth (a range of frequencies within a given band particularly used for transmitting a signal) for only 21 dollars in a month.

It is also known as the first of the class for its 12 servers in all countries around the world. For anyone who likes to spread their websites for all the best market place country in Europe, Asia and/or USA you really have to try one of these products. They manage to not –never overloaded their servers so that no one of their costumers would likely to fail in being protected (and believe me, I only found these interesting words in here and not everywhere else). They also equipped their servers an Intel Dual Processor Multi core with 8 GM RAM and 1000 Mbps connection backbone.

Well, some reviews almost all of them always saying that ASPHostPortal is easy, simple and cheap. It is most likely the best ASP.NET hosting provider for anyone who is an expert or just a newbie program developer.

How To Using Node Services In ASP.NET Core

How To Using Node Services In ASP.NET Core

CheapASPNETHostingReview.com | Best and cheap ASP.NET Core Hosting. This post is about running Javascript code in the Server. Because a huge number of useful, high-quality Web-related open source packages are in the form of Node Package Manager (NPM) modules. NPM is the largest repository of open-source software packages in the world, and the Microsoft.AspNetCore.NodeServices package means that you can use any of them in your ASP.NET Core application.

aspnet-mvc-poster


To use Node Services, first you need to include the reference of Microsoft.AspNetCore.NodeServices package in your project file. You can do this using dotnet add package Microsoft.AspNetCore.NodeServices command.

Then you need to add the Node Services middleware to the request pipeline. You can do it in your ConfigureServices() method.

Now you’re able to get instance of INodeServices in your application. INodeServices is the API through which .NET code can make calls into JavaScript that runs in a Node environment. You can use FromServices attribute to get the instance of `INodeServices’ in your action method. Here is Add method implementation in MVC.

And here is the code of AddModule.js file

You need to use the type of the result in your InvokeAsync method, in this example I am using int. NodeServices allows ASP.NET Core developers to make use of the entire NPM ecosystem, which gives rise to a huge range of possibilities. You can find the full source code on GitHub.

Happy Programming.

ASP.NET Core Identity Tables Customization With Visual Studio 2017

ASP.NET Core Identity Tables Customization With Visual Studio 2017

CheapASPNETHostingReview.com | Best and cheap ASP.NET Core 1.0 hosting. In this article, we will use Visual Studio 2017 and Entity Framework Core step by step to learn how we can:

  1. Change Identity table names.
  2. Change Identity table property names.
  3. Change Identity table datatype of primary key.

When you decide to use ASP.NET Core Identity it will generate some tables used to store data for users and other things.

Prior to it, let’s take a brief definition about ASP.NET Core Identity.

Released on 2016 and from the name we can say it’s all about identity of the users, you can manage login and Logout functionality, create an account also you can use external login providers such as Facebook, Google, Microsoft Account and Twitter. In other words, you can say, it gives you the ability to make an authentication and an authorization.

Let us see it in action

Open your Visual Studio 2017

image001

I am using an Enterprise edition but you can use any edition, which is available to you.

File > New > Project

Click ASP.NET Core Web Application and give it a name, as shown below.

image002

Select Web Application.

image003

Click Change authentication, select an individual user account and click OK, as shown below.

image004

Now, we have an Application but we need to make migration and we have several ways to achieve it. We will use Package Manager, as shown below

image005

Now, you need to create the database. Go to appsettings.json file and edit your connection string, if you want. I am using SQL Server 2016, so this is my appsettings.json file and it looks, as shown below.

Now, in Package Manager console, write Add-migration command, followed by the name of this migration command like this and wait for some seconds.

image006

Now, update the database and click enter.

image007

Now, go to the database and refresh it. You will find aspnet-IdentityConfig database with some tables created by default like AspNetUsers table.

We will use this table to achieve our goal.

image008

Now, how can we change this table name from AspNetUsers to AspUsers as example.

It’s database stuff, so we can achieve this from ApplicationDbContext class.

image009

To be specific from OnModelCreating method into this class, we can customize our ASP.NET Identity model and override the defaults like change table name, property name and others.

We will change the table name now from AspNetUsers to AspUsers by this code inside OnModelCreating method. Proceed, as shown below.

Note- After any customization in the tables, you should make database migration and update it to reflect the changes.

First, write add-migration. Subsequent to the migration, update the database.

image010

Now, refresh the database and you will find the name changed to AspUsers.

image011

Change Identity table property name

We need to change as an example Email to EmailAddress in AspUser table

image012

It’s very similar to what we did before, just we will add the code to the OnModelCreating

In this code we told entity to get Email property and change this column name to EmailAddress

Now you should make a migration to reflect your changes on Database and we will use it as usual

Add-Migration command then Update-Database

image013

Now it’s time to look in the database

image014

Change Identity table datatype of primary key

We will need to make some changes in ApplicationUser class so go to this class and open it

image015

ApplicationUser class contains all the custom information I want to store about a user, also inheritance here from IdentityUser gives me all essentials like username ,id, password property or Email, that means if I want to add any property, I will add it here in ApplicationUser class

By default the primary key is string

image016

Because IdentityUser has the primary key  we want to pass our new primary key datatype.

Where will we pass this new datatype? Look to the picture below

image017

As you can see we need to pass our primary key as example int datatype to IdentityUser<int> .

The code will look like this

And because every user has roles we will need to make this change in roles also by creating new class ApplicationRole which will inherit from IdentityRole class and pass the new datatype to it, and the code will look, as shown below.

Afterwards, we will make some change in our ApplicationDbContext class in order to open it.

image018

We need to add our new role and datatype IdentityDbContext to the class. It will look, as shown below.

In the last step, we will need to reconfigure ConfigureServices method in the startup class.

We need to make some changes in these lines.

We need to replace IdentityRole class to our role ApplicationRole class and add our new datatype to AddEntityFrameworkStores<ApplicationDbContext,int>

The code will look, as shown below.

Now, we have all the required changes achieved but the last step will be the migration.

This time, we have some new things like when you run add-migration command; you will see the warning, as shown below.

image019

When you try to run update-database, you will get an error told to you.

To change the IDENTITY property of a column, the column needs to be dropped and recreated.

Thus, we will drop the database and create it again.

Step 1

Drop the database command to remove the database and press Y.

Step 2

Remove all the migrations, which you have in Visual Studio.

Step 3

Run add-migration command.

Step 4

Run update-database command.

Now, go to the database to see our changes.

image020

You see now that id has int datatype and not nvarchar.

Summary

Now, you can change an Identity column name, Identity table name, Identity primary key. I hope this is helpful to you.

How To Create ASP.NET Core Web API in Visual Studio 2015

How To Create ASP.NET Core Web API in Visual Studio 2015

CheapASPNETHostingReview.com | Best and cheap ASP.NET Core 1.0 hosting. This tutorial lets us create very basic ASP.NET Core Web API using Visual Studio 2015. We will be creating Contacts API which lets do popular CRUD operations.

ASP.NET Web API is a framework that makes it easy to build HTTP services that reach a broad range of clients, including browsers and mobile devices.

ASP.NET Web API is an ideal platform for building RESTful applications on the .NET Framework. Update 12/10 – Updated to ASP.NET Core 1.0 with EF Core

Step 1 : Contacts API Overview

The Contacts API is very simple, basic Web API which does CRUD operations. I have focused on writing web API rather than integrating it with databases.  This table summaries Contacts API which we’ll create

tble

Step 2: Create ASP.NET Core Web API project

Install ASP.NET Core 1.0

Open Visual Studio 2015 Update 3, create “New Project” with name “ContactsApi

From ASP.NET Core templates select “Web API” as shown in image (I haven’t selected any Authentication, we will add them later)

apiFirst

Program.cs is newly added file, it’s entry point when application run, that’s right public static void main(). ASP.NET Core apps are considered as console apps.

Step 3: Packages included for ASP.NET Core Web API

The packages included are “MVC”, “EnvironmentalVariables”, “JSON”, “Logging”. (This is generated by default, do not copy this)

Step 4: Creating Contacts model

Contacts class is centre of this Web API project. Its POCO class containing some properties which are self explanatory.

Right click “ContactsApi” solution, create folder “Models“; under this “Models” folder create C# class “Contacts.cs” and copy this code

Step 5: Create and Register repository class for Contacts

The use of repository classes is really optional, but I have added it so that we can connect to any databases later.

Create “Repository” folder under “ContactsApi” solution, we will add one C# interface file and C# class file implementing this interface.

Create “IContactsRepository.cs” interface file in “Repository” folder and copy below code

Create “ContactsRepository.cs” class file, implement “IContactsRepository” and copy below code

ASP.NET MVC 6 provides out of box support for Dependency Injection, we will include that in our “ConfigureServices” method of Startup.cs.  We will see entire code in Step 7

Step 6: Add Contacts API Controller

Its time to add the controller API which acts as Web API. Create “Controllers” folder under “ContactsApi” project solution and add C# class file “ContactsController.cs“; copy below code

Some quick notes of this ContactsController

  1. [Route(“api/[controller]”)] – this used attribute based routing to access the ASP.NET Core Web API.
  2. ContactsRepo is instantiated using dependency injection which we configure in services.cs.
  3. GetAll() is simple HttpGet method which gets all contacts
  4. GetById fetches contact based on mobile phone. Its given HttpGet with Name attribute so that we can use that in Create method to be used for location header.
  5. Create method after inserting contact, returns 201 response and provides location header.

Note: HTTP Status codes are now written as BadReqest(), NotFound()Unauthorized() etc

Step 7: Enable CamelCasePropertyNamesContractResolver

Any Web Api (REST based) should return JSON response in form of Camel Case so that we can sure consume the API in any client. We need to enable CamelCasePropertyNamesContractResolver in Configure Services.

Here is the Startup.cs file which has all code needed for running this Contacts ASP.NET Core Web API.

Claim Based Security on ASP.NET Core 1.0

Claim Based Security on ASP.NET Core 1.0

CheapASPNETHostingReview.com | Best and cheap ASP.NET Core 1.0 hosting. Even though the ASP.NET Web platform and ASP.NET project scaffold have undergone some significant changes, ASP.NET MVC Views and Controllers have faced rather minor transformation in comparison with the shift in skeleton of the Application with the new platform. So here’s a brief outline of the latest news in ASP.NET development.

In this article, I’m going to describe the main concepts of building claim-based security on top of a brand-new platform: ASP.NET Core (with .NET Core). At the same time, I will create an application with similar functionality (as was done in my previous article), highlighting the differences.

Let’s get down to work. Create a “Hello World” ASP.NET Core Web application using the .NET Core framework

Claims1

Figure 1: Creating a new ASP.NET Core Web application

Just like in the previous version of ASP.NET MVC, the main job is done. The default Visual Studio .NET Web Project template has already added all the namespaces and assemblies required for our test project. The only thing left is to implement simple functionality to add a new Claim during the user registration/creational process and then apply the authorization restriction to the user with the Claim specified.

Let’s quickly review the most important pieces of functionality responsible for security work this time:

Startup.cs is a class for the entire application bootstrap, including security:

Models\ApplicationUser.cs contains an ApplicationUser class that derives from Microsoft.AspNetCore.Identity.EntityFrameworkCore.IdentityUser:

Until now, it’s been empty, so this is where we should add our claims. Let’s start applying code changes to demonstrate Claim-based security in real life:

1. Enable Entity Framework Migrations

Enable Entity Framework Migrations if there are any iterative changes to Claims planned. Because ASP.NET Identity uses Code First, auto-migration would be useful to perform database schema updates

2. Add Relevant Properties

Add all relevant properties to the ApplicationUser class (in file Models\ApplicationUser.cs) to store the Claims. Let’s take “BirthDate” and add this property to ApplicationUser. Don’t forget to add the using System clause before class definition.

3. Add EF Migration

Add EF migration to the update database with the new field. In the Package Manager Console, perform the following steps:

  1. Add-Migration “Age” <press Enter> to create an upgrade script for our modification.
  2. Update-Database <press Enter> to run a database schema update.

Now, we need to implement the filling out of the Birthday value. To make it more obvious, add a Birthday parameter to the User Registration form in the Models\AccountViewModels\RegisterViewModel.cs RegisterViewModel class:

4. Update the Views\Account\Register.cshtml File

Update the Views\Account\Register.cshtml file with the new field:

5. Update the Controllers\AccountController.cs Register Method

Update the Controllers\AccountController.cs Register method to pass Birthday:

6. Add the Claims

Now, we need to add the Claims. To be more precise, we need a mechanism to add the Claims in ASP.NET Core because Microsoft.AspNetCore.Identity.SignInManager<TUser>, by default, includes only username and user identifier claims. SignInManager<TUser> uses IUserClaimsPrincipalFactory<TUser> to generate ClaimsPrincipal from TUser (in our case, from ApplicationUser).

We need to create our own implementation of IUserClaimsPrincipalFactory<TUser> to add custom claims. To not generate the boilerplate code, simply derive it from the default UserClaimsPrincipalFactory<TUser> which is already implementing IUserClaimsPrincipalFactory<TUser>.

7. Register CustomClaimsPrincipalFactory

We need to register our CustomClaimsPrincipalFactory in Startup.cs after the Identity setup has been added:

8. Verify the Claim

We have implemented the Claims setup. The only thing left is to verify the Claim. It is a common practice to write custom Authorize filters to verify the availability and particular value of the Claim pair, and then put that filter on the controllers’ actions.

Claim BirthDay requires more checks, so I will implement verification of the Claim just for demonstration purposes in the Controllers\HomeController.cs About method:

Any Claim may be extracted easily from the HttpContext.User at any point of the project.

Traditionally, let’s try to verify if the code works.

Reviewing all the Claims (in debug window):

Claims4

Figure 4: Viewing the Claims in the debug window

Conclusion

That was a step-by-step guideline to set up Claim-based security in ASP.NET Core with the help of ASP.NET Core Identity.

Compared to the previous-generation ASP.NET MVC, at first glance implementation of the Claim-based security looks more complicated in ASP.NET Core. Previously, it was possible to add the Claims directly in the ApplicationUser implementation via overriding the GenerateUserIdentityAsync() method. In ASP.NET Core, we need to implement IUserClaimsPrincipalFactory<TUser> that is internally used by SignInManager<TUser>. On the other hand, we’ve got more structured classes and interfaces implementation in ASP.NET Core, as logically SignInManager should indeed control sign-in processes (including claims) and ApplicationUser should be just an IdentityUser.

One more useful thing that was introduced in ASP.NET Core is Claim-Based Authorization on top of Policies. It simplifies the verification of Claims on Controllers and Methods, thereby providing an ability to group the Claims.