I had been looking for a suitable hosting provider for my website and, believe me, there are almost thousands of sites selling the same ASP for almost similar price and services. And of course, I never thought to find ‘the one’ from all of them without trying to read their ‘specification’ and sure their trusted offices. Finding a hosting provider does not seem as easy as it looks.
As the result, just for your information ASP.Net coming from an open – source server – side website application framework designed for web development to produce a dynamic web page. It is first released in 2002 and it allows programmer to build their own dynamic websites, web applications and web services. As a beginner front end developer, or just a newbie website programmer, I am trying to find the simplest and well known web hosting and trustable hosting provider to start with.
That is why I want to help you with my reviews about ASPHostportal ASP.NET core hosting and I hope it would be useful for anyone who just (like me) trying to find the best – fit web hosting and/or hosting provider which you can compare to another hosting provider. Also for their pros and cons based on my experience as a paying costumer.
As one of the most well – known web hosting, finding user reviews about the ASPHostPortal wouldn’t be such a difficulty. Some of them even (specifically) starting to explain with details almost on every side of the product itself. I am not going to go that far by the way (especially because it is just a review) and just sharing my perception about the web hosting by their services, speeds, performances, up time and soon.
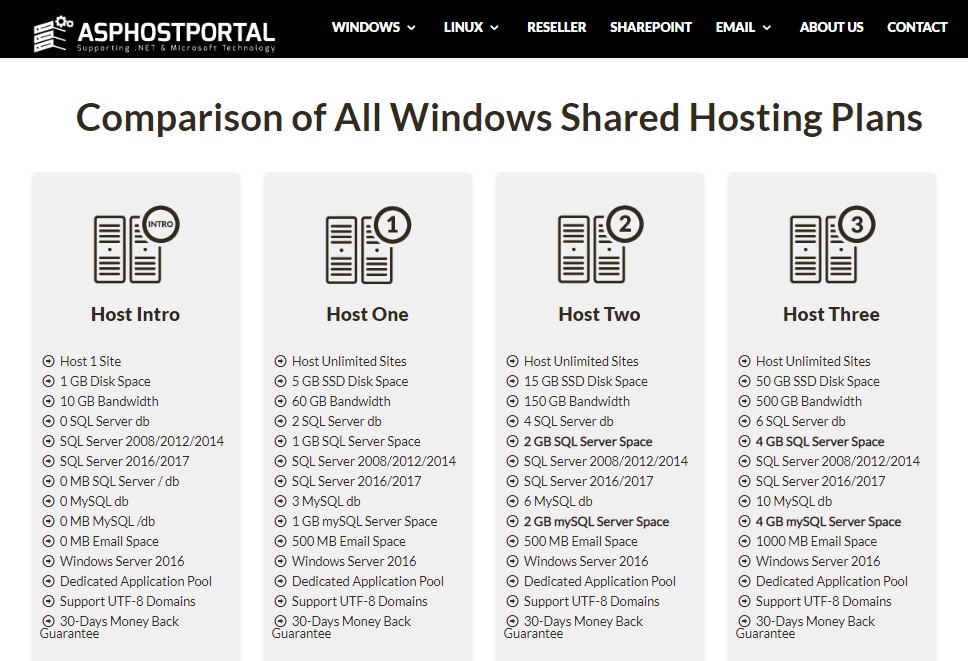
Pricing and Plan Structure
Actually, compared to any other hosting provider with their own monthly payment prices, ASPHostPortal might give you the cheapest price for their ASP web hosting services. I have been looking and comparing for the four (or more) ASP.Net provider and it is just shocked me that they sell it starting from almost only one dollar in a month. The ranges of prices are reasonable and I am not saying that the other hosting provider puts a higher price for the same products. They have almost similar in prices starting from 1 dollar up to 2 or 3 dollars for a month (not include renewable prices).
What makes them different is coming from bonuses, discount and renewal prices, but I can assure you that it does affordable. You might choose the best hosting provider by meticulously breakdown their true value into different parts like looking at their core hosting features or else.
Core hosting features are something called with the “3 D’s” – domains, databases and disk space, like specification besides of your chosen web hosting. They usually put the core hosting features right down below the prices as one of the marketing strategies which ease you to pick your favorable web hosting. The name ‘core’ purposed for your hosting server to served website files when someone types your domain names. Here’s your “3 D’s” consideration:
Domains, about how many domain names you want from your hosting account with provided charge for each selection. If you need multiple websites you should also have multiple domain names.
Databases are about how many, website software could be use and run on your hosting server.
Disk space is just another how big data and files you could put on your server.
ASPHostPortal makes things much simpler by providing 2 of the most wanted ASP hosting server that is Windows and Linux (which I think it is most basically concentrated more in their Windows ASP). The difference is just about the number of hosting you might need and of course according to their features inside.
1 Giga bite disk space and 10 GB bandwidth for only a dollar in a month is something you should really try because I am not lying that ASPHostPortal is just not an ordinary hosting provider. It is trustable and they are professional workers for almost 11 years now.
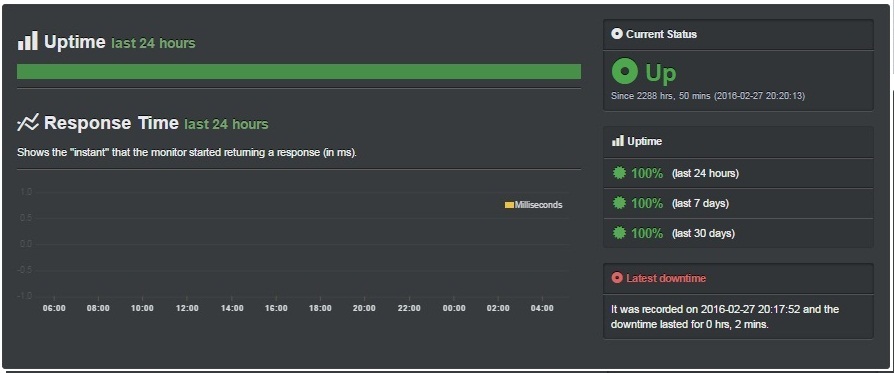
Security, Reliability and Performance
As said that ASPHostPortal is one of the most recommended windows hosting in the world, I think it is quite good for some reasons. What I mean is, how fast your website would run and another trouble about buffering or else in performance is something you should know before choosing your own web hosting. Well, I have been running the ASPHostPortal and finding that their moderate yet stable speed is about 99.99% uptime (it is guaranteed) and it is of course high quality which the world (mostly) uptime standard is about 99%.
Well, I am not trying to call their service support at 12 o’clock in the midnight just to verify whether they truly have 24/7 support management or not. Just once, in the morning and the response is quite fast and problem solving so I think it is similar enough with thousand other reviewers, ASPHostPortal does have professional support and its 30 days guaranteed or your money back.
ASPHostPortal also provided by ‘reseller’ panels for anyone who wants to sell their already ‘management’ website and it is helpful because some other hosting provider doesn’t and also, together with its ‘take line’ by providing the best web hosting for the cheapest price, you can also buy 10 resellers website with 40 GB disk space and 200 GB bandwidth (a range of frequencies within a given band particularly used for transmitting a signal) for only 21 dollars in a month.
It is also known as the first of the class for its 12 servers in all countries around the world. For anyone who likes to spread their websites for all the best market place country in Europe, Asia and/or USA you really have to try one of these products. They manage to not –never overloaded their servers so that no one of their costumers would likely to fail in being protected (and believe me, I only found these interesting words in here and not everywhere else). They also equipped their servers an Intel Dual Processor Multi core with 8 GM RAM and 1000 Mbps connection backbone.
Well, some reviews almost all of them always saying that ASPHostPortal is easy, simple and cheap. It is most likely the best ASP.NET hosting provider for anyone who is an expert or just a newbie program developer.
Right Now, No output because dynamic controls are lost in postback then what to do. So we need to save dynamic controls value and generate dynamic controls again.we need to maintain viewstate.
CheapASPNETHostingReview.com | Best and cheap ASP.NET hosting. “Creating a mathematical expression evaluator is one of the most interesting exercises in computer science, whatever the language used. This is the first step towards really understanding what sort of magic is hidden behind compilers and interpreters….“.
I agree completely, and hope that you do too.
Using the CalcEngine class
The CalcEngine class performs two main tasks:
Parses strings that contain formulas into Expression objects that can be evaluated.
Evaluates Expression objects and returns the value they represent.
To evaluate a string that represents a formula, you call the CalcEngine.Parse method to get an Expression, then call the Expression.Evaluate method to get the value. For example:
1
2
3
varce=newCalcEngine();
varx=ce.Parse("1+1");
varvalue=(double)x.Evaluate();
Alternatively, you can call the CalcEngine.Evaluate method directly. This parses the string into an expression, evaluates the expression, and returns the result. For example:
1
2
varce=newCalcEngine();
varvalue=(double)ce.Evaluate("1+1");
The advantage of the first method is that it allows you to store the parsed expressions and re-evaluate them without re-parsing the same string several times. However, the second method is more convenient, and because the CalcEngine has a built-in expression cache, the parsing overhead is very small.
Functions
The CalcEngine class implements 69 functions, selected from Excel’s over 300. More functions can be added easily using the RegisterFunction method.
RegisterFunction takes a function name, the number of parameters (minimum and maximum), and a delegate that is responsible for evaluating the function. For example, the “atan” function is implemented as follows:
1
2
3
4
5
6
7
varce=newCalcEngine();
ce.RegisterFunction("ATAN2",2,Atan2);
staticobjectAtan2(List<Expression>p)
{
returnMath.Atan2((double)p[0],(double)p[1]);
}
Function names are case-insensitive (as in Excel), and the parameters are themselves expressions. This allows the engine to calculate expressions such as “=ATAN(2+2, 4+4*SIN(4))”.
The CalcEngine class also provides a Functions property that returns a dictionary containing all the functions currently defined. This can be useful if you ever need to enumerate remove functions from the engine.
Notice how the method implementation listed above casts the expression parameters to the expected type (double). This works because the Expression class implements implicit converters to several types (string, double, bool, and DateTime). I find that the implicit converters allow me to write code that is concise and clear.
If you don’t like implicit converters, the alternative would be to override ToString in the Expression class and add ToDouble, ToDateTime, ToBoolean, etc.
Variables: Binding to simple values
Most calculation engines provide a way for you to define variables which can be used in expressions. The CalcEngine class implements a Variables dictionary that associates keys (variable names) and values (variable contents).
For example, the code below defines a variable named angle and calculates a short sine table:
1
2
3
4
5
6
7
8
9
10
11
12
13
14
15
16
17
18
19
20
21
// create the CalcEngine
varce=newCalcEngine.CalcEngine();
// calculate sin from 0 to 90 degrees
for(intangle=0;angle<=90;angle+=30)
{
// update value of "angle" variable
ce.Variables["angle"]=angle;
// calculate sine
varsin=ce.Evaluate("sin(angle * pi() / 180)");
// write it out
Console.WriteLine("sin({0}) = {1}",angle,sin);
}
// output:
sin(0)=0
sin(30)=0.5
sin(60)=0.866025403784439
sin(90)=1
Variables: Binding to CLR objects
In addition to simple values, the CalcEngine class implements a DataContext property that allows callers to connect a regular .NET object to the engine’s evaluation context. The engine uses Reflection to access the properties of the object so they can be used in expressions.
This approach is similar to the binding mechanism used in WPF and Silverlight, and is substantially more powerful than the simple value approach described in the previous section. However, it is also slower than using simple values as variables.
For example, if you wanted to perform calculations on an object of type Customer, you could do it like this:
1
2
3
4
5
6
// Customer class used as a DataContext
publicclassCustomer
{
publicstringName{get;set;}
publicdoubleSalary{get;set;}
publicList
CalcEngine supports binding to sub-properties and collections. The object assigned to the DataContext property can represent complex business objects and entire data models.
This approach makes it easier to integrate the calculation engine into the application, because the variables it uses are just plain old CLR objects. You don’t have to learn anything new in order to apply validation, notifications, serialization, etc.
Variables: Binding to dynamic objects
The original usage scenario for the calculation engine was an Excel-like application, so it had to be able to support cell range objects such as “A1” or “A1:B10”. This requires a different approach, since the cell ranges have to be parsed dynamically (it would not be practical to define a DataContext object with properties A1, A2, A3, etc).
To support this scenario, the CalcEngine implements a virtual method called GetExternalObject. Derived classes can override this method to parse identifiers and dynamically build objects that can be evaluated.
If the object returned implements the CalcEngine.IValueObject interface, the engine evaluates it by calling the IValueObject.GetValue method. Otherwise, the object itself is used as the value.
If the object returned implements the IEnumerable interface, then functions that take multiple values (such as Sum, Count, or Average) use the IEnumerable implementation to get all the values represented by the object.
For example, the sample application included with this article defines a DataGridCalcEngine class that derives from CalcEngine and overrides GetExternalObject to support Excel-style ranges. This is described in detail in a later section (“Adding Formula Support to the DataGridView Control”).
Optimizations
I mentioned earlier that the CalcEngine class performs two main functions: parsing and evaluating.
If you look at the CalcEngine code, you will notice that the parsing methods are written for speed, sometimes even at the expense of clarity. The GetToken method is especially critical, and has been through several rounds of profiling and tweaking.
For example, GetToken detects characters and digits using logical statements instead of the convenient char.IsAlpha or char.IsDigit methods. This does make a difference that shows up clearly in the benchmarks.
In addition to this, CalcEngine implements two other optimization techniques:
Expression caching
The parsing process typically consumes more time than the actual evaluation, so it makes sense to keep track of parsed expressions and avoid parsing them again, especially if the same expressions are likely to be used over and over again (as in spreadsheet cells or report fields, for example).
The CalcEngine class implements an expression cache that handles this automatically. The CalcEngine.Evaluate method looks up the expression in the cache before trying to parse it. The cache is based on WeakReference objects, so unused expressions eventually get removed from the cache by the .NET garbage collector. (This technique is also used in the NCalc library.)
Expression caching can be turned off by setting the CalcEngine.CacheExpressions property to false.
Expression optimization
After a string has been parsed, the resulting expression can sometimes be optimized by replacing parts of the expression that refer only to constant values. For example, consider the expression:
1
{4*(4*ATAN(1/5.0)-ATAN(1/239.0))+A+B}
This expression contains several constants and functions of constants. It can be simplified to:
1
{3.141592654+A+B}
This second expression is equivalent to the first, but can be evaluated much faster.
Expression simplification was surprisingly easy to implement. It consists of a virtual Expression.Optimize method that is called immediately after an expression is parsed.
The base Expression class provides an Optimize method that does nothing:
1
2
3
4
5
6
7
classBinaryExpression:Expression
{
publicvirtual Expression Optimize()
{
returnthis;
}
...
This simply allows all derived classes that derive from Expression to implement their own optimization strategy.
For example, the BinaryExpression class implements the Optimize method as follows:
1
2
3
4
5
6
7
8
9
10
11
12
classBinaryExpression:Expression
{
publicoverride Expression Optimize()
{
_lft=_lft.Optimize();
_rgt=_rgt.Optimize();
return_lft._token.Type==TKTYPE.LITERAL&&
_rgt._token.Type==TKTYPE.LITERAL
?newExpression(this.Evaluate())
:this;
}
..
The method calls the Optimize method on each of the two operand expressions. If the resulting optimized expressions are both literal values, then the method calculates the result (which is a constant) and returns a literal expression that represents the result.
To illustrate further, function call expressions are optimized as follows:
1
2
3
4
5
6
7
8
9
10
11
12
13
14
15
16
17
18
19
20
21
22
classFunctionExpression:Expression
{
publicoverride Expression Optimize()
{
boolallLits=true;
if(_parms!=null)
{
for(inti=0;i<_parms.Count;i++)
{
varp=_parms[i].Optimize();
_parms[i]=p;
if(p._token.Type!=TKTYPE.LITERAL)
{
allLits=false;
}
}
}
returnallLits
?newExpression(this.Evaluate())
:this;
}
...
First, all parameters are optimized. Next, if all optimized parameters are literals, the function call itself is replaced with a literal expression that represents the result.
Expression optimization reduces evaluation time at the expense of a slight increase in parse time. It can be turned off by setting the CalcEngine.OptimizeExpressions property to false.
Globalization
The CalcEngine class has a CultureInfo property that allows you to define how the engine should parse numbers and dates in expressions.
By default, the CalcEngine.CultureInfo property is set to CultureInfo.CurrentCulture, which causes it to use the settings selected by the user for parsing numbers and dates. In English systems, numbers and dates look like “123.456” and “12/31/2011”. In German or Spanish systems, numbers and dates look like “123,456” and “31/12/2011”. This is the behavior used by Microsoft Excel.
If you prefer to use expressions that look the same on all systems, you can set the CalcEngine.CultureInfo property to CultureInfo.InvariantCulture for example, or to whatever your favorite culture happens to be.
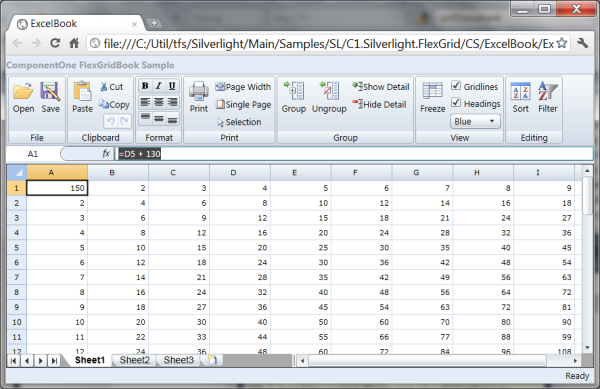
Sample: A DataGridView control with formula support
The sample included with this article shows how the CalcEngine class can be used to extend the standard Microsoft DataGridView control to support Excel-style formulas. The image at the start of the article shows the sample in action.
Note that the formula support described here is restricted to typing formulas into cells and evaluating them. The sample does not implement Excel’s more advanced features like automatic reference adjustment for clipboard operations, selection-style formula editing, reference coloring, and so on.
The DataGridCalcEngine class
The sample defines a DataGridCalcEngine class that extends CalcEngine with a reference to the grid that owns the engine. The grid is responsible for storing the cell values which are used in the calculations.
The DataGridCalcEngine class adds cell range support by overriding the CalcEngine.GetExternalObject method as follows:
1
2
3
4
5
6
7
8
9
10
11
12
13
14
15
16
17
18
19
20
21
22
23
24
25
26
27
28
29
30
/// &lt;summary>
/// Parses references to cell ranges.
/// &lt;/summary>
/// &lt;param name="identifier">String representing a cell range
/// (e.g. "A1" or "A1:B12".&lt;/param>
/// &lt;returns>A &lt;see cref="CellRange"/> object that represents
The method analyzes the identifier passed in as a parameter. If the identifier can be parsed as a cell reference (e.g., “A1” or “AZ123:XC23”), then the method builds and returns a CellRangeReference object. If the identifier cannot be parsed as an expression, the method returns null.
The CellRangeReference class is implemented as follows:
The CellRangeReference class implements the IValueObject interface to return the value in the first cell in the range. It does this by calling the owner grid’s Evaluate method.
The CellRangeReference also implements the IEnumerable interface to return the value of all cells in the range. This allows the calculation engine to evaluate expressions such as “Sum(A1:B10)”.
Notice that the GetValue method listed above uses an _evaluating flag to keep track of ranges that are currently being evaluated. This allows the class to detect circular references, where cells contain formulas that reference the cell itself or other cells that depend on the original cell.
The DataGridCalc class
The sample also implements a DataGridCalc class that derives from DataGridView and adds a DataGridCalcEngine member.
To display formula results, the DataGridCalc class overrides the OnCellFormatting method as follows:
The method starts by retrieving the value stored in the cell. If the cell is not in edit mode, and the value is a string that starts with an equals sign, the method uses CalcEngine to evaluate the formula and assigns the result to the cell.
If the cell is in edit mode, then the editor displays the formula rather than the value. This allows users to edit the formulas by typing into in the cells, just like they do in Excel.
If the expression evaluation causes any errors, the error message is displayed in the cell.
At this point, the grid will evaluate expressions and show their results. But it does not track dependencies, so if you type a new value into cell “A1” for example, any formulas that use the value in “A1” will not be updated.
To address this, the DataGridCalc class overrides the OnCellEditEnded method to invalidate the control. This causes all visible cells to be repainted and automatically recalculated after any edits.
Let’s not forget that implementation of the Evaluate method used by the CellRangeReference class listed earlier. The method starts by retrieving the cell content. If the content is a string that starts with an equals sign, the method evaluates it and returns the result; otherwise it returns the content itself:
That is all there is to the DataGridCalc class. Notice that calculated values are never stored anywhere . All formulas are parsed and evaluated on demand.
The sample application creates a DataTable with 50 columns and 50 rows, and binds that table to the grid. The table stores the values and formulas typed by users.
The sample also implements an Excel-style formula bar across the top of the form that shows the current cell address, content, and has a context menu that shows the functions available and their parameters.
Finally, the sample has a status bar along the bottom that shows summary statistics for the current selection (Sum, Count, and Average, as in Excel 2010). The summary statistics are calculated using the grid’s CalcEngine as well.
Testing
I built some testing methods right into the CalcEngine class. In debug builds, these are called by the class constructor:
1
2
3
4
5
6
7
8
9
10
publicCalcEngine()
{
_tkTbl=GetSymbolTable();
_fnTbl=GetFunctionTable();
_cache=newExpressionCache(this);
_optimize=true;
#if DEBUG
this.Test();
#endif
}
This ensures that tests are performed whenever the class is used (in debug mode), and that derived classes do not break any core functionality when they override the base class methods.
The Test method is implemented in a Tester.cs file that extends the CalcEngine using partial classes. All test methods are enclosed in an #if DEBUG/#endif block, so they are not included in release builds.
This mechanism worked well during development. It helped detect many subtle bugs that might have gone unnoticed if I had forgotten to run my unit tests when working on separate projects.
Benchmarks
While implementing the CalcEngine class, I used benchmarks to compare its size and performance with alternate libraries and make sure CalcEngine was doing a good job. A lot of the optimizations that went into the CalcEngine class came from these benchmarks.
I compared CalcEngine with two other similar libraries which seem to be among the best available. Both of these started as CodeProject articles and later moved to CodePlex:
NCalc: This is a really nice library, small, efficient, and feature-rich. I could not use NCalc in my Silverlight project because it relies on the ANTLR runtime DLL, which cannot be used in Silverlight projects (at least I couldn’t figure out how to do it).
Flee: Unlike CalcEngine and NCalc, Flee keeps track of formulas, their values, and dependencies. When a formula changes, Flee re-evaluates all cells that depend on it. One of the interesting features of Flee is that it actually compiles formulas into IL. This represents a trade-off since compilation is quite slow, but evaluation is extremely fast. I decided not to use Flee in my Silverlight project because it is relatively large and the parsing times were too long for the type of application I had in mind.
The benchmarking method was similar to the one described by Gary Beene in his 2007 Equation Parsers article. Each engine was tested for parsing and evaluating performance using three expressions. The total time spent was used to calculate a “Meps” (million expressions parsed or evaluated per second) index that represents the engine speed.
The expressions used were the following:
1
2
3
4*(4*Atan(1/5.0)-Atan(1/239.0))+a+b
Abs(Sin(Sqrt(a*a+b*b))*255)
Abs(Sin(Sqrt(a^2+b^2))*255)
Where “a” and “b” are variables set to 2 and 4.
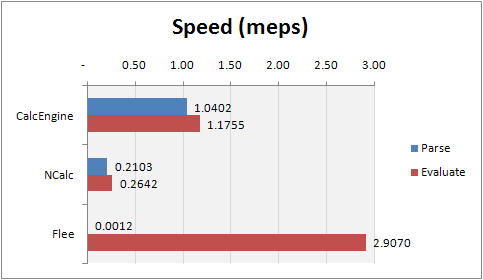
Each engine parsed and evaluated the expressions 500,000 times. The times were added and used to calculate the “Meps” index by dividing the number of repetitions by the time consumed. The results were as follows:
Time in seconds
Speeds in “Meps”
Library
Parse
Evaluate
Parse
Evaluate
CalcEngine
1.4
1.3
1.04
1.18
NCalc
7.1
5.7
0.21
0.26
Flee
1,283.0
0.5
0.00
2.91
CalcEngine*
10.7
1.5
0.14
0.99
NCalc*
145.2
5.7
0.01
0.27
Some comments about the benchmark results:
CalcEngine performed well, being the fastest parser and the second fastest evaluator (after Flee).
Flee is literally “off the charts” on both counts, almost 900 times slower parsing and 2.5 times faster evaluating than CalcEngine. Because Flee compiles formulas to IL, I expected slow parsing and fast evaluation, but the magnitude of the difference was surprising.
Entries marked with asterisks were performed with optimizations off. They are included to demonstrate the impact of the optimization options.
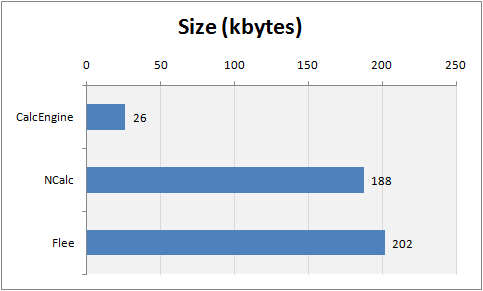
In addition to speed, size is important, especially for Silverlight applications that need to be downloaded to the client machine. Here is a comparison of library sizes:
Library
Size (kB)
CalcEngine
26
NCalc
188
Flee
202
CalcEngine is the smallest library by far, more than seven times smaller than NCalc. If necessary, it could be trimmed even further by removing some of the less important built-in functions.
Conclusion
The CalcEngine class is compact, fast, extensible, and multi-platform. I think it is different enough from NCalc and Flee to add value for many types of projects, especially Silverlight applications like the one it was created for. You can see the Silverlight app in action in the image below.
I hope others will find CalcEngine useful and interesting as well.
CheapASPNETHostingReview.com | Best and cheap ASP.NET Core 1.0 hosting. The Web.Config is gone and the AppSettings are gone with ASP.NET Core 1.0. How do we configure our ASP.NET Core Application now? With the Web.Config, also the config transform feature is gone. How do we configure a ASP.NET Core Application for specific deployment environments?
Configuring
Unfortunately a newly started ASP.NET Core Application doesn’t include a complete configuration as a sample. This makes the jump-start a little difficult. The new Configuration is quite better than the old one and it would make sense to add some settings by default. Anyway, lets start by creating a new Project. Open the Startup.cs and take a look at the controller. There’s already something like a configuration setup. This is exactly what the newly created application needs to run.
1
2
3
4
5
6
7
8
9
10
11
12
13
14
publicStartup(IHostingEnvironment env)
{
// Set up configuration sources.
varbuilder=newConfigurationBuilder()
.AddJsonFile("appsettings.json")
.AddEnvironmentVariables();
if(env.IsDevelopment())
{
// This will push telemetry data through Application Insights
// pipeline faster, allowing you to view results immediately.
But in the most cases you need much more configuration. This code creates a ConfigurationBuilder and adds a appsettigns.json and environment variables to the ConfigurationBuilder. In development mode, it also adds ApplicationInsights settings. If you take a look into the appsettings.json, you’ll only find a ApplicationInsights key and some logging specific settings (In case you chose a individual authentication you’ll also
see a connection string:
1
2
3
4
5
6
7
8
9
10
11
12
13
{
"ApplicationInsights":{
"InstrumentationKey":""
},
"Logging":{
"IncludeScopes":false,
"LogLevel":{
"Default":"Verbose",
"System":"Information",
"Microsoft":"Information"
}
}
}
Where do we need to store our custom application settings? We can use this appsettings.json or any other JSON file to store our settings. Let’s use the existing one to add a new section called AppSettings:
This looks nice, but how do we read this settings?
In the Startup.cs the Configuration is already built and we could use it like this:
var configurationSection = Configuration.GetSection(“AppSettings”);
var title = configurationSection.Get<string>(“ApplicationTitle”);
var topItmes = configurationSection.Get<int>(“TopItemsOnStart”);
var showLink = configurationSection.Get<bool>(“ShowEditLink”); We can also provide a default value in case that item doesn’t exist or in case it is null
var topItmes = configurationSection.Get<int>(“TopItemsOnStart”, 15);
To use it everywhere we need to register the IConfigurationRoot to the dependency injection container:
But this seems not to be a really useful way to provide the application settings to our application. And it looks almost similar as in the previous ASP.NET Versions. But the new configuration is pretty much better. In previous versions we created a settings facade to encapsulate the settings, to not access the configuration directly and to get typed settings. No we just need to create a simple POCO to provide access to the settings globally inside the application:
1
2
3
4
5
6
publicclassAppSettings
{
publicstringApplicationTitle{get;set;}
publicintTopItemsOnStart{get;set;}
publicboolShowEditLink{get;set;}
}
The properties of this class should match the keys in the configuration section. Is this done we are able to map the section to that AppSettings class:
This fills our AppSettings class with the values from the configuration section. This code also adds the settings to the IoC container and we are now able to use it everywhere in the application by requesting for the IOptions<AppSettings>:
With this approach, you are able to create as many configuration sections as you need and you are able to provide as many settings objects as you need to your application. What do you think about it? Please let me know and drop a comment.
Environment specific configuration
Now we need to have differnt configurations per deployment environment. Let’s assume we have a production, a staging and a development environment where we run our application. All this environments need another configuration, another connections string, mail settings, Azure access keys, whatever… Let’s go back to the Startup.cs to have a look into the constructor. We can use the IHostingEnvironment to load different appsettings.json files per environment. But we can do this in a pretty elegant way:
We can just load another JSON file with an environment specific name and with optional set to true. Let’s say the appsettings.json contain the production and the default
settings and the appsettings.Staging.json contains the staging sepcific settings. It we are running in Staging mode, the second settings file will be loaded and the existing settings will be overridden by the new one. We just need to sepcify the settings we want to override.
Setting the flag optional to true means, the settings file doesn’t need to exist. Whith this approatch you can commit some default setings to the source code repository and the top secret access keys and connections string, could be stored in an appsettings.Development.json, an appsettings.staging.json and an appsettings.Production.json on the buildserver or on the webserver directly.
Conclusion
As you can see, configuration in ASP.NET Core is pretty easy. You just need to know how to do it. Because it is not directly visible in a new project, it is a bit difficult to find the way to start.
CheapASPNETHostingReview.com | Best and cheap ASP.NET Hosting. Sometimes we need to provide backup and restore facility in ASP.NET application in application’s control panel. In this article, I am going to explain how to develop a database backup and restore application in ASP.NET. I have taken example of SQL Server in this article however, this application can be used to backup and restore any database that .NET supports. You just need to change their provider instead of System.Data.SqlClient and a single SQL Statement to list the table names of the database. I will explain them in details later in this article.
My Backup and Restore web application looks like below:
1. Create a UI for database backup and restore
In this step, let us create a simple UI in ASP.NET to list all the database tables in the ListBox control that let the end user select the table to take backup and restore. Also put two buttons named Backup and Restore to do its respective functionality. My code for above UI looks like below:
2. Populate the database table in the ListBox control
In this step, we will write method that will populate all database tables in the ListBox control that will let the end user select the table to perform Backup or Restore. My code looks like below:
You can notice in the above code snippet, I am calling a method named PopulateDatabaseTables() in the Not IsPostBack condition under Page_Load event that will populate all the tables of the database in the ListBox control. Notice the select statement that has been stored into sql variable. This select statement varies between databases to databases. To list all the tables in SQL Server database, you need to use above select statement. To list all the tables of the MySQL database, you need to write “show tables” in place of above select statement. Of course, you need to change the provider as well to connect to the MySQL database.
3. Code for taking backup of the selected table
In this step, we shall write code to take backup of the selected table when Backup button will be clicked. You can see that in OnClick event of the Backup button, I have specified BackupNow method. Let us see the code for this method.
lblMessage.Text="Backup for table <b>"+tableName+"</b> successful!";
}
}
In the above code snippet, I have got the selected table name form ListBox in the tableName variable. Selected all records from that table and filled into a DataSet named dSetBackup. Later on I used WriteXml method of DataSet to write the contents of the selected table in an xml file. The name of the xml file will be the table name in my case and will be placed in the backup folder. Then I have written a success message. This way your end user will be able to take backup of all the tables in the database.
4. Code for restoring selected table
In this step, we shall see how to restore a selected table into the database once the Restore button will be clicked. Notice the Restore button where I have specified RestoreNow method in the OnClick event. The code for this method looks like below:
// Loop through all rows of the selected table and add into dSetBackup DataSet
foreach(DataRow row indSet.Tables[0].Rows)
{
dSetBackup.Tables[0].NewRow();
dSetBackup.Tables[0].Rows.Add(row.ItemArray);
}
// Create a command builder to update dSetBackup DataSet
SqlCommandBuilder cmd=newSqlCommandBuilder(dAd);
// Following update command will push all added rows of dSetBackup DataSet into the database
dAd.Update(dSetBackup,tableName);// We are done !!!
}
}
lblMessage.Text="Restore of table <b>"+tableName+"</b> successful!";
}
}
}
Please note that in order to above code snippet work, you must have the schema in place into the Restore database. This schema must match the original database schema from which you had taken backup otherwise your restore will not work.
In the above code snippet, I am first getting the connection string of the database where we need to restore the data. Then I am getting the schema of the selected table into the dSetBackup DataSet using dAd (SqlDataAdapter), as there will not be any row into the restore database, so it will only give the schema of the table. This will help us to push the backed up data into this DataSet. In the next line, I have read the backed up xml of the table using ReadXml method of the DataSet that will get all the backed up data for that table into the dSet DataSet. In next line, I am looping through every rows of the dSet DataSet table and adding them into our dSetBackup DataSet. Next, I have created a SqlCommandBuilder object for the SqlDataAdapter. This will internally build insert, update, delete statement for the dSetBackup DataTable. In the following line, I have used dAd.Update (SqlDataAdapter update method) to push the data into the restore database. At last I am writing the success message. Simple! Isn’t it?