
CheapASPNETHostingReview.com | Best and cheap ASP.NET Core 1.1 hosting. With the ASP.NET Core 1.1 many new features were introduced. One of them was enabling gZip compression and today we will take a look at another new feature which is Response Caching Middleware. This middleware allows to implement response caching. Response caching adds cache-related headers to responses. These headers specify how you want client, proxy and middleware to cache responses. It can drastically improve performance of your web application. In this post, let’s see how to implement response caching in ASP.Net Core application.
Response Caching in ASP.Net Core 1.1
To use this middleware, make sure you have ASP.NET 1.1 installed. You can download and install the .NET Core 1.1 SDK.
Let’s create an ASP.NET Core application. Open Project.json and include following nuget package.
1 | "Microsoft.AspNetCore.ResponseCaching": "1.1.0" |
Once the package is restored, now we need to configure it. So open Startup.cs, add highlight line of code in ConfigureServices method.
1 2 3 4 5 6 7 | public void ConfigureServices(IServiceCollection services) { // Add framework services. services.AddApplicationInsightsTelemetry(Configuration); services.AddResponseCaching(); services.AddMvc(); } |
And now let’s add this middleware to HTTP pipeline, so add highlighted line in the Configure method of Startup.cs.
1 2 3 4 5 6 7 8 9 10 11 12 13 14 15 16 17 18 19 20 21 22 23 24 | public void Configure(IApplicationBuilder app, IHostingEnvironment env, ILoggerFactory loggerFactory) { loggerFactory.AddConsole(Configuration.GetSection("Logging")); loggerFactory.AddDebug(); app.UseResponseCaching(); app.UseApplicationInsightsRequestTelemetry(); if (env.IsDevelopment()) { app.UseDeveloperExceptionPage(); app.UseBrowserLink(); } else { app.UseExceptionHandler("/Home/Error"); } app.UseApplicationInsightsExceptionTelemetry(); app.UseStaticFiles(); app.UseMvc(routes => { routes.MapRoute( name: "default", template: "{controller=Home}/{action=Index}/{id?}"); }); } |
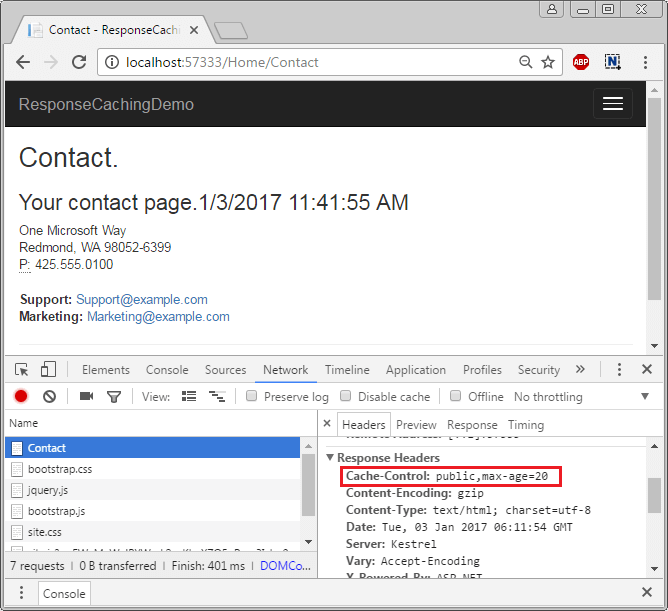
We are done with all configurations. To use it, you need to include ResponseCache attribute on controller’s action method. So open HomeController.cs and add ResponseCache attribute to Contact method and set the duration to 20 seconds. For the demo, I modified the contact method and add Date time to see response caching in action.
1 2 3 4 5 6 7 | [ResponseCache(Duration = 20)] public IActionResult Contact() { ViewData["Message"] = "Your contact page." + DateTime.Now.ToString(); return View(); } |
This attribute will set the Cache-Control header and set max-age to 20 seconds. The Cache-Control HTTP/1.1 general-header field is used to specify directives for caching mechanisms in both requests and responses. Use this header to define your caching policies with the variety of directives it provides. In our case, following header will be set.
1 | Cache-Control:public,max-age=20 |
Here the cache location is public and expiration is set to 20 seconds. Read this article to know more about HTTP Caching.
Now let’s run the application to see it in action. When you visit contact page, you should see the current date and time of your system. As the cache duration is set to 20 seconds, the response will be cached for 20 seconds. You can verify it via visiting other pages of the application and then coming back to Contact page.
During a browser session, browsing multiple pages within the website or using back and forward button to visit the pages, content will be served from the local browser cache (if not expired). But when page is refreshed via F5 , the request will be go to the server and page content will get refreshed. You can verify it via refreshing contact page using F5. So when you hit F5, response caching expiration value has no role to play to serve the content. You should see 200 response for contact request.
Static contents (like image, css, js) when refreshed, will result in 304 Not Modified if nothing has changed for the requested content. This is due to the ETag and Last-Modified value append in the response header. See below image (Screenshot taken in Firefox)
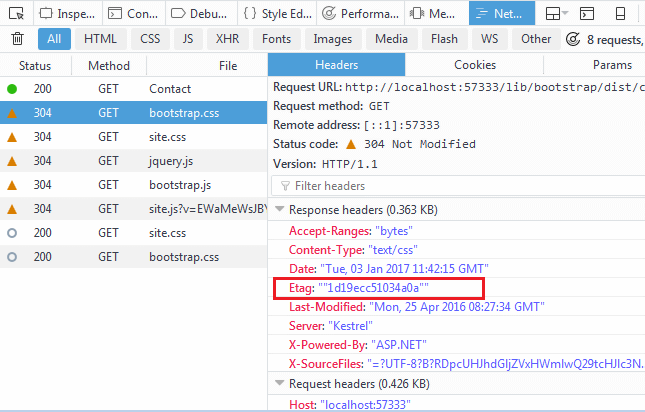
Firefox gives 304 where chrome gives 200 response for static files. Strange behavior from Chrome.
When a resource is requested from the site, the browser sends ETag and Last-Modified value in the request header as If-None-Match and If-Modified-Since. The server compares these header’s value against the value present on the server. If values are same, then server doesn’t send the content again. Instead, the server will send a 304 - Not Modified response, and this tells the browser to use previously cached content.
Other options with ResponseCache attribute
Along with duration, following options can also be configured with ResponseCache attribute.
- Location: Gets or sets the location where the data from a particular URL must be cached. You can assign Any, Client or None as cache location.
1 2 3 4 5 6 7 8 9 10 | // Determines the value for the "Cache-control" header in the response. public enum ResponseCacheLocation { // Cached in both proxies and client. Sets "Cache-control" header to "public". Any = 0, // Cached only in the client. Sets "Cache-control" header to "private". Client = 1, // "Cache-control" and "Pragma" headers are set to "no-cache". None = 2 } |
- NoStore: Gets or sets the value which determines whether the data should be stored or not. When set to true, it sets “Cache-control” header to “no-store”. Ignores the “Location” parameter for values other than “None”. Ignores the “duration” parameter.
- VaryByHeader: Gets or sets the value for the Vary response header.
Thank you for reading. Keep visiting this blog and share this in your network. Please put your thoughts and feedback in the comments section.